Getting Started with DeskDirector
DeskDirector Portals
Browser Support
What is the DeskDirector Admin Portal?
What is the DeskDirector TECH Portal?
What is the DeskDirector Client Portal?
Desktop Portal
Managing Your Account
Pricing & Subscription Plans
Deskdirector - Sign up walk through
Managing your DeskDirector Subscription
Admin Essentials
Release Notes
Permissions & Feature Configuration (ConnectWise/Autotask Partners)
Automatic Contact Creation
The Developer Corner
DeskDirector Features Overview
Logging in to DeskDirector
Desktop Portal Version Differences
Managing Tickets with DeskDirector
User Profiles & Profile Pictures
Office Hours
How Searching Works
Embedding Help Page Media
Get started with the DeskDirector Power Automate Connector
Features
Portal Customization
Service Catalogue
Forms
Communication
Actionable Messages for Emails
Real-Time Chats
Notifications
Email Notifications
Email Template Engine
Surveys
Broadcasts
Generative AI
Ticket Summary for TECH Portal
DeskDirector with Generative AI
Setting up AI Service Providers
AI Assistants in DeskDirector
Custom Tools for AI Assistants
Knowledge Bases for AI Assistants
Set up Microsoft Foundry Agent Service with DeskDirector Portals
Advanced
Login & Authentication
Contact Groups
Accounts and Companies
Contacts
Approvals
Task Lists
The Learning Center
Tags
Custom Domains
File Storage
Portal Deep Linking
Service Dashboard
Auditing and Analytics
Integrations
ConnectWise
ConnectWise Custom Menu Item for DeskDirector Tech Portal
ConnectWise
ConnectWise Quotes & Invoices
ConnectBooster
ConnectWise - Avoid Aggressive Notifications
AutoTask
Switching or Merging PSAs
QuoteWerks
Wise-Pay
TimeZest
BiggerBrains
OneNote Notebooks
Integrations - Frequently Asked Questions
IT Glue
Microsoft Teams App
Introducing the DeskDirector for Microsoft Team App
Installing the Microsoft Teams App (Client Mode)
Installing the Microsoft Teams App (TECH Mode)
Setting up Tags for Teams Discussions (TECH Portal)
Branding the DeskDirector Teams App
DeskDirector Teams App Notifications
User Groups Integration with Microsoft Teams
Setting up Content Security Policy (CSP)
Advanced topic: Setting up Tech & Client Mode in the same tenancy
Integrating Microsoft Teams with DeskDirector Tech Portal
Smart Alerts for TECH Users
Microsoft Power Automate
Actions
Solutions
Power Automate Template Gallery
Featured Solution: Teams Ticket Discussion
Featured Solution: Ticket Briefing
Power Automate Administration
Power Automate Connector - Setting up your first flow
DeskDirector Power Platform Connector Reference
Troubleshooting
Troubleshooting via Web Developer Tools
Diagnose Entities Tool
Troubleshooting DeskDirector Connection Issues
Permissions & Access - Common Issues
Tickets & Chats - Common Issues
ConnectWise Audit Trail - Exporting API Logs
Contact DeskDirector Support
Desktop Portal - Common Issues
Contact Impersonation
DeskDirector Desktop App - Installation Issues
Login & Authentication - Common Issues
Approvals - Common Issues
Email & Email Delivery - Common Issues
PSA Entity Syncing - Common Issues
PSA Integration - Common Issues
ConnectWise Integration - Common Issues
Autotask Integration - Common Issues
Microsoft Teams App - Common Issues
Security
Glossary
Archived
Table of Contents
- All Categories
- Microsoft Power Automate
- Actions
- Action: Create an email from template
Action: Create an email from template
Templated Email Flow
This article explores the "Create an email from template" action from our Power Automate Connector.
Intro
This action generates HTML for an email body based on a chosen template from the "Flow template" section in your DeskDirector admin console. It does not have any send functionality, so it needs to be used in tandem with a send action from another connector, e.g, Outlook.
The advantages of using this action are:
- Styling: You can easily craft good-looking, responsive emails instead of sending plain HTML. If you've used Outlook's "Send an email" action in Power Automate, you are likely sending emails without any styling. It is possible to add inline styling, but this is hard to do within the small text box.
- Dynamic Content: You can leverage Liquid template language to process input tokens or customise email content before sending.
See these related articles if you are unfamiliar with our email template engine.
Usage
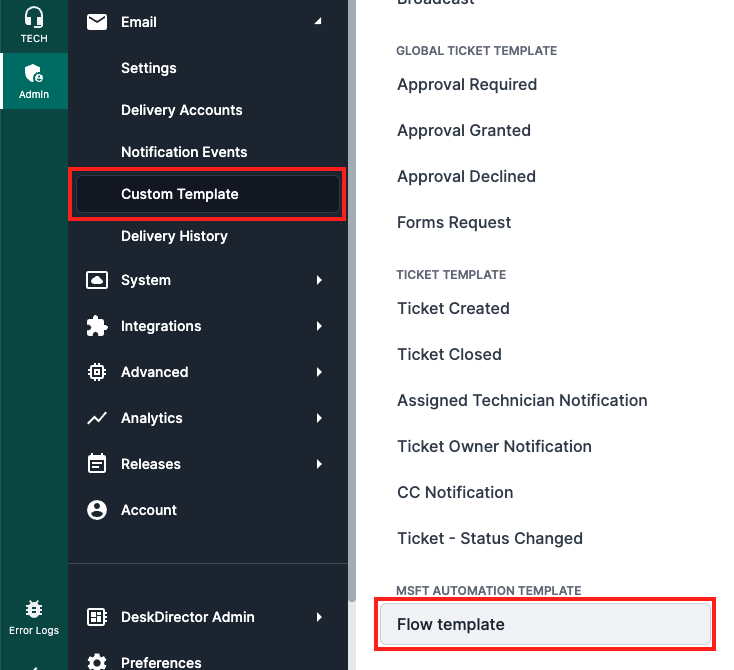
- In the Admin Portal, have an existing custom email template in the "Flow template" section. If your template is not in this section, it will not appear in the Power Automate action.
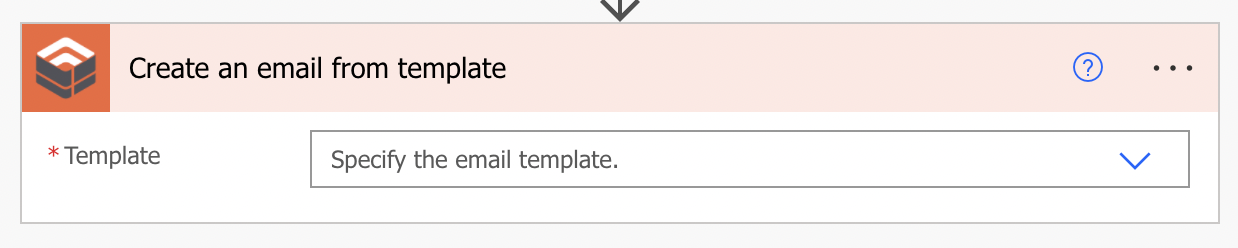
- In Power Automate, add the "Create an email from template" action and select your template from the dropdown.
- If your template has any custom tokens, they will appear as inputs so you can enter values for them.
- Use a send action from another connector e.g Office 365 Outlook - Send an email. For the email body, select the output of "Create an email from template". If you are using the Outlook action, switch the body input to Code View (</> button).
- Your flow should look like the following. ContactName is a custom token specified in the template.

Implementation Example
In this example, we will be extending the "Unassigned open tickets digest" flow to use a custom email template. The flow template can be downloaded from our Template Gallery.
Create the email template
Firstly, create the email template we have prepared. There are two ways to do this:
- Import via your DeskDirector instance's Swagger UI
- Navigate to
https://{subdomain}.deskdirector.com/swagger - Find this API under v3, Email Templates:
POST /api/v3/email/types/{type}/templates. You won't need an API key if you are already logged in to your instance as an admin. - Enter the following:
- type: dynamic
- req: paste the contents of this file: UnassignedTicketsDigestEmail.json
- Parameter content type: application/json
- Press Try it out! button. This will create the email template in your instance.
- Navigate to
- Or, manually create the template
- Create a new custom template under the Flow template section. Call it "Unassigned Tickets Digest Email Template"
- In the Code tab, replace the sample code with the contents of this file: UnassignedTicketsDigestEmailMjml.txt
- There will be some errors because some tokens have not been created yet. In the Tokens tab, create three custom tokens:
- totalCount: number. Sample: 50
- resultsCount: number. Sample: 20
- htmlTableString: string. Sample: <table><tr><th>col1</th><th>col2</th></tr></table>
- The template should now be error-free, save
The template is now ready to use in Power Automate.
Use in Power Automate Flow
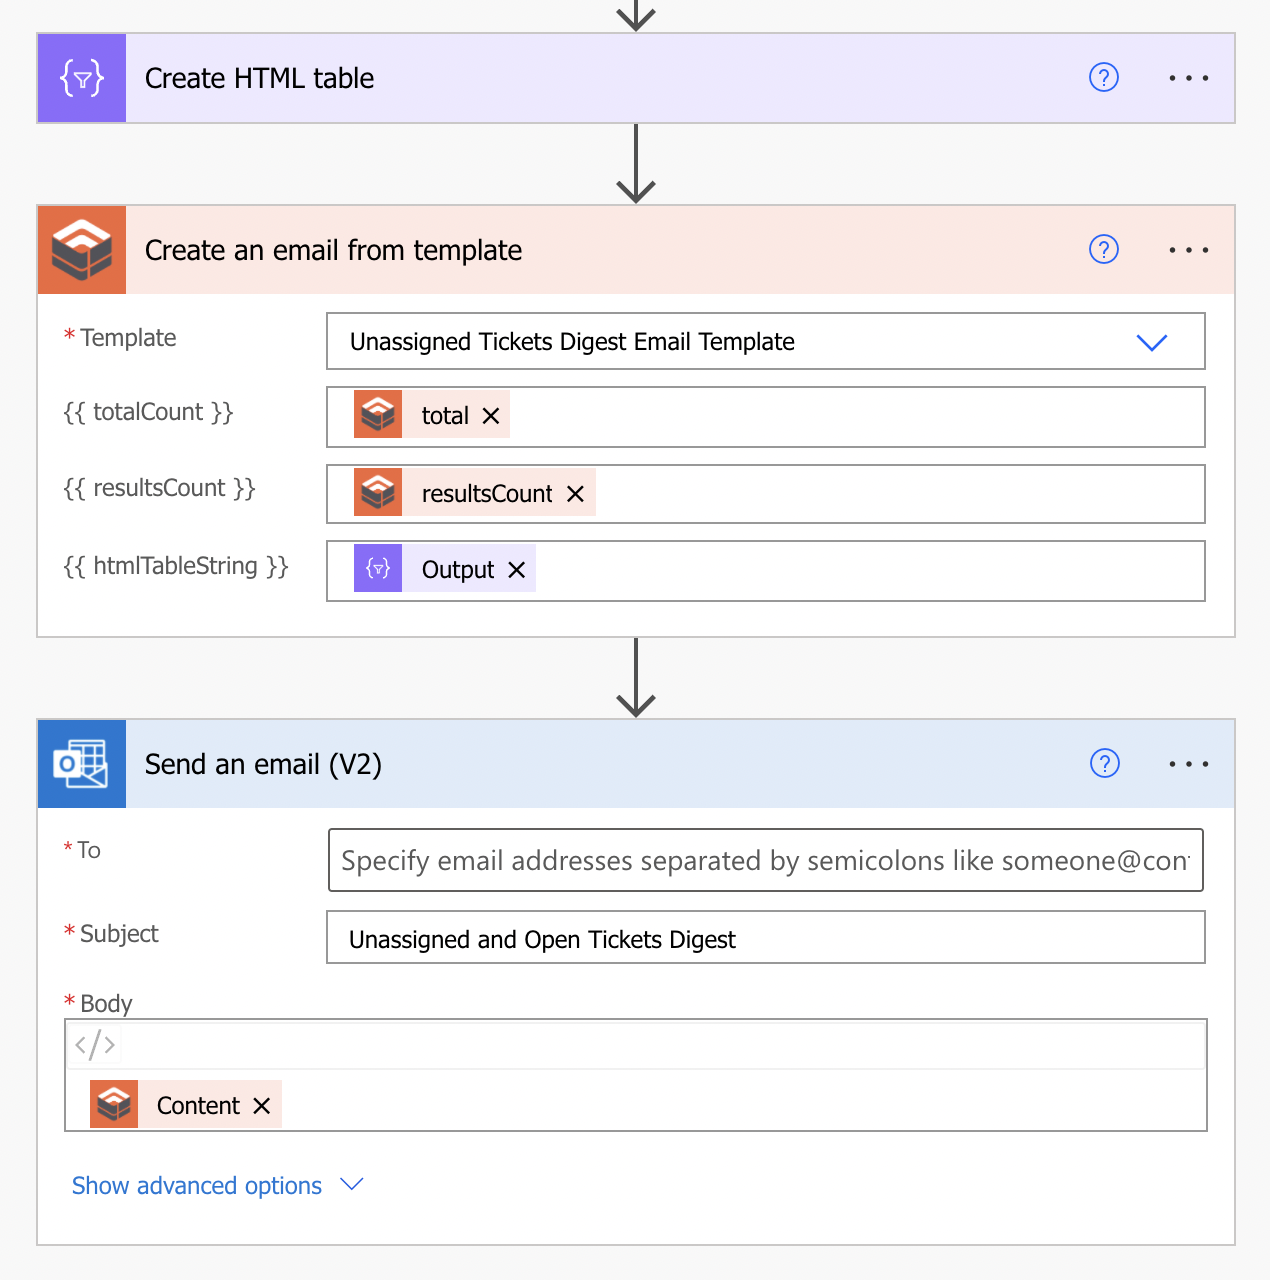
- Add the Create an email from template action between Create HTML table and Send an email (V2) actions.
- Configure the Create an email from template action:
- Template: select the template we just created: Unassigned Tickets Digest Email Template
- totalCount: total from Find tickets
- resultsCount: resultsCount from Find tickets
- htmlTableString: Output from Create HTML table
- Configure the Send an email (V2) action:
- Body
- Delete all existing content
- Switch to Code View, </> button
- Content from Create an email from template
- Body
- The final result will look like the following image. Run the flow to see the email template in action.