Getting Started with DeskDirector
DeskDirector Portals
Browser Support
What is the DeskDirector Admin Portal?
What is the DeskDirector TECH Portal?
What is the DeskDirector Client Portal?
Desktop Portal
Managing Your Account
Pricing & Subscription Plans
Deskdirector - Sign up walk through
Managing your DeskDirector Subscription
Admin Essentials
Release Notes
Permissions & Feature Configuration (ConnectWise/Autotask Partners)
Automatic Contact Creation
The Developer Corner
DeskDirector Features Overview
Desktop Portal Version Differences
Logging in to DeskDirector
Managing Tickets with DeskDirector
User Profiles & Profile Pictures
Office Hours
How Searching Works
Embedding Help Page Media
Get started with the DeskDirector Power Automate Connector
Features
Portal Customization
Service Catalogue
Forms
Communication
Actionable Messages for Emails
Real-Time Chats
Notifications
Email Notifications
Email Template Engine
Surveys
Broadcasts
Generative AI
DeskDirector with Generative AI
Setting up AI Service Providers
AI Assistants in DeskDirector
Custom Tools for AI Assistants
Knowledge Bases for AI Assistants
Ticket Summary for TECH Portal
Set up Microsoft Foundry Agent Service with DeskDirector Portals
Advanced
Login & Authentication
Accounts and Companies
Contacts
Contact Groups
Approvals
Task Lists
The Learning Center
Tags
Custom Domains
File Storage
Portal Deep Linking
Service Dashboard
Auditing and Analytics
Integrations
ConnectWise
ConnectWise Custom Menu Item for DeskDirector Tech Portal
ConnectWise
ConnectWise Quotes & Invoices
ConnectBooster
ConnectWise - Avoid Aggressive Notifications
AutoTask
Switching or Merging PSAs
QuoteWerks
Wise-Pay
TimeZest
BiggerBrains
OneNote Notebooks
Integrations - Frequently Asked Questions
IT Glue
Microsoft Teams App
Introducing the DeskDirector for Microsoft Team App
Installing the Microsoft Teams App (Client Mode)
Installing the Microsoft Teams App (TECH Mode)
Setting up Tags for Teams Discussions (TECH Portal)
Branding the DeskDirector Teams App
DeskDirector Teams App Notifications
User Groups Integration with Microsoft Teams
Setting up Content Security Policy (CSP)
Advanced topic: Setting up Tech & Client Mode in the same tenancy
Integrating Microsoft Teams with DeskDirector Tech Portal
Smart Alerts for TECH Users
Microsoft Power Automate
Actions
Solutions
Power Automate Template Gallery
Featured Solution: Teams Ticket Discussion
Featured Solution: Ticket Briefing
Power Automate Administration
Power Automate Connector - Setting up your first flow
DeskDirector Power Platform Connector Reference
Troubleshooting
Troubleshooting via Web Developer Tools
Desktop Portal - Common Issues
Contact & Service Agent Impersonation
Diagnose Entities Tool
DeskDirector Desktop App - Installation Issues
Troubleshooting DeskDirector Connection Issues
Login & Authentication - Common Issues
Permissions & Access - Common Issues
Tickets & Chats - Common Issues
Approvals - Common Issues
Email & Email Delivery - Common Issues
PSA Entity Syncing - Common Issues
PSA Integration - Common Issues
ConnectWise Integration - Common Issues
Autotask Integration - Common Issues
ConnectWise Audit Trail - Exporting API Logs
Microsoft Teams App - Common Issues
Contact DeskDirector Support
Security
Glossary
Archived
Table of Contents
- All Categories
- Archived
- Task List Templates
Task List Templates
Task list templates are reusable templates that can be attached to request types, or manually attached to a ticket by an agent.
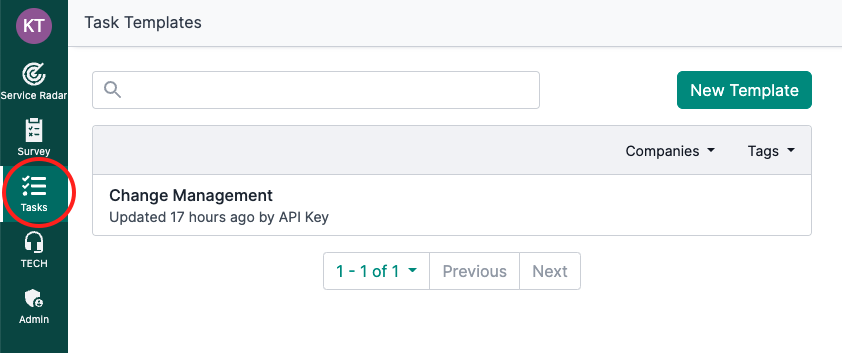
The template editor can be accessed in the Admin and Tech portals by members with the following permissions: advanced member, admin, master admin. Click on the "Tasks" button on the side nav.

Task List Template Gallery
Collection of task list templates that you can import into your own instance. More templates getting added soon...
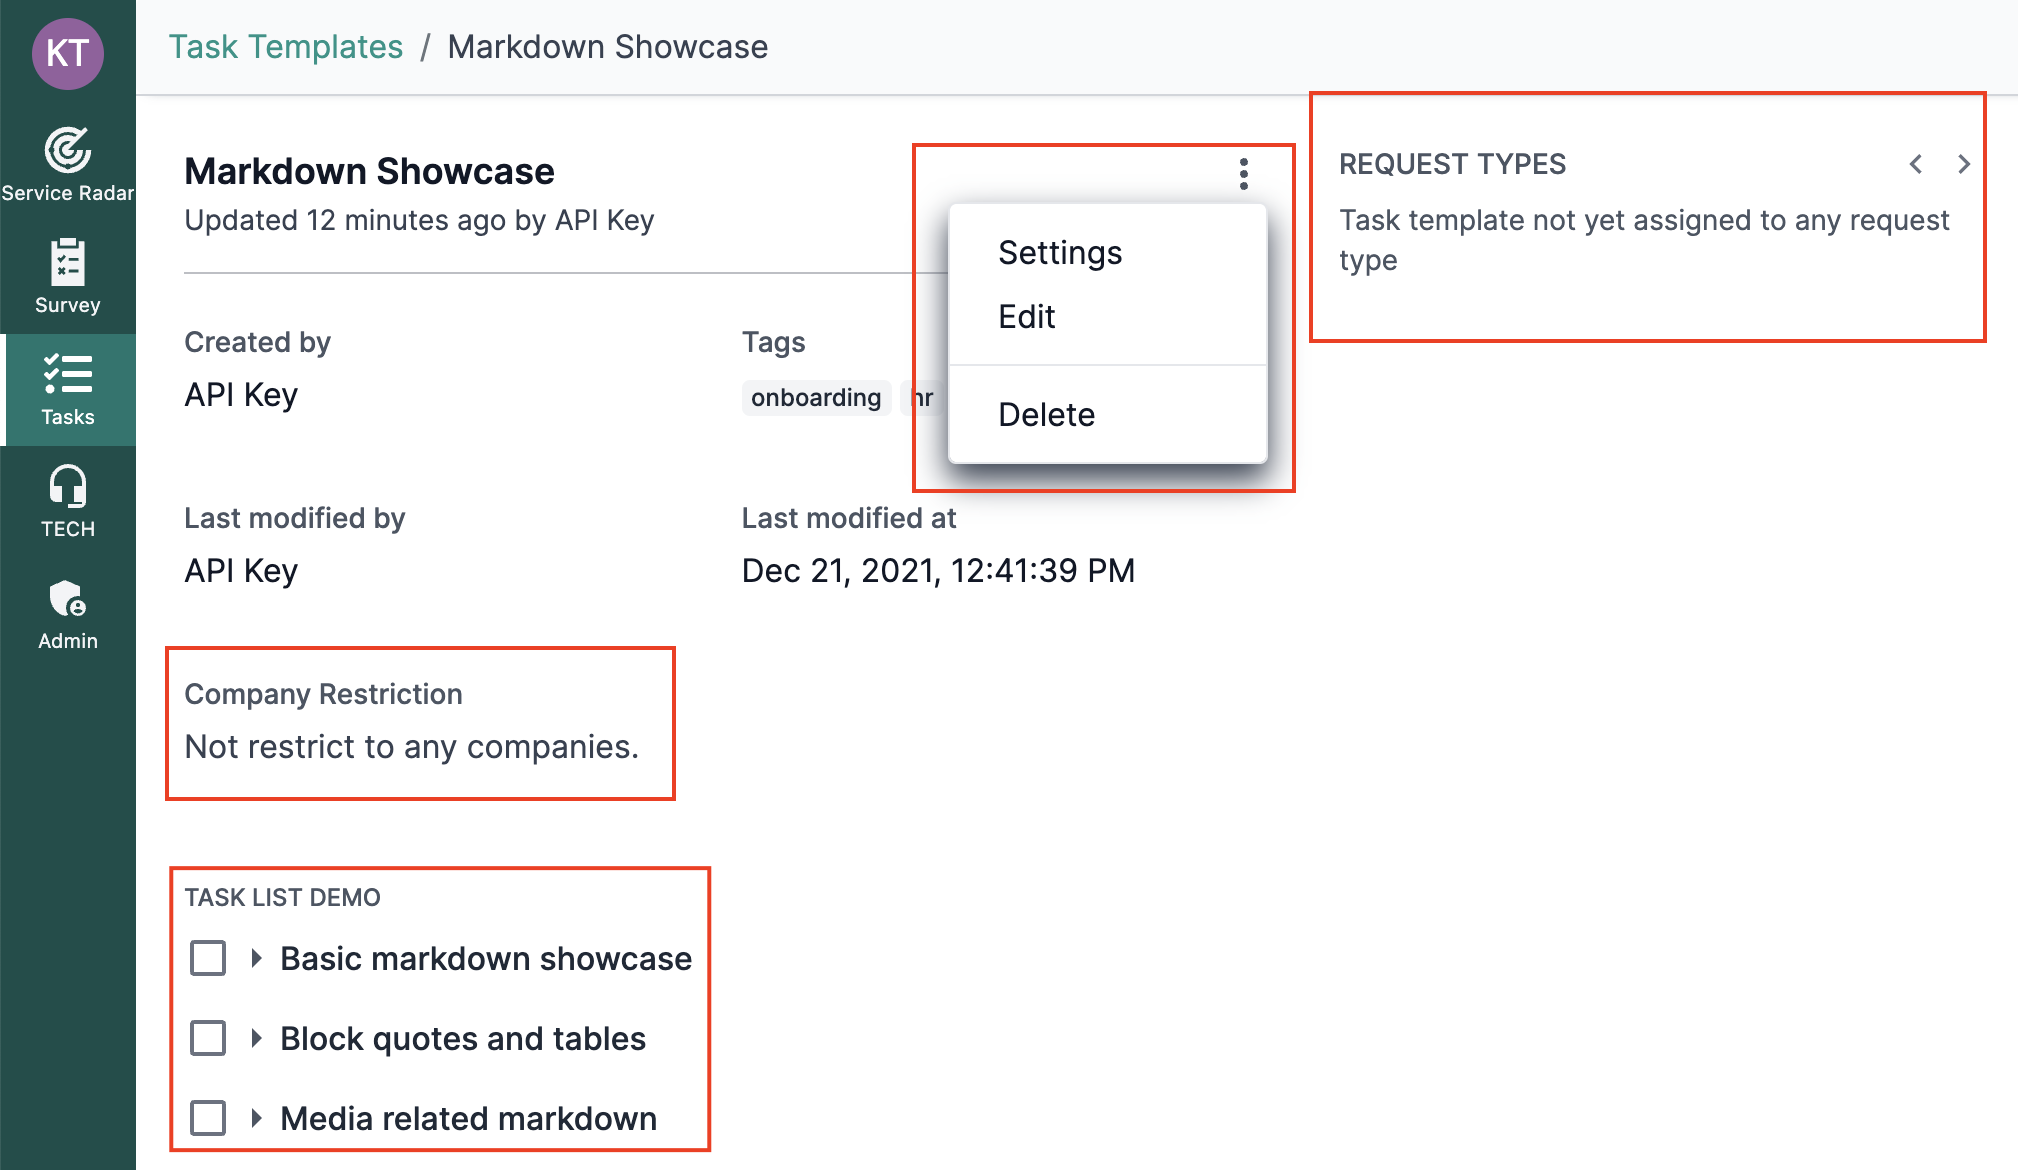
Template Overview

- Menu > Settings: edit the name, tags and company restrictions
- Menu > Edit: opens task list template editor
- Request Types: the task list is automatically added when a ticket is created using the request type. Read more.
- Company Restriction: restrict the template to certain companies. If a company does not have access to the template, it will not be automatically added via request type. The template also won't appear as an option if a tech is manually adding a task list to a ticket from that company.
- Task List Demo: displays a preview of the task list. Expand an item to see the description.
Template Editor

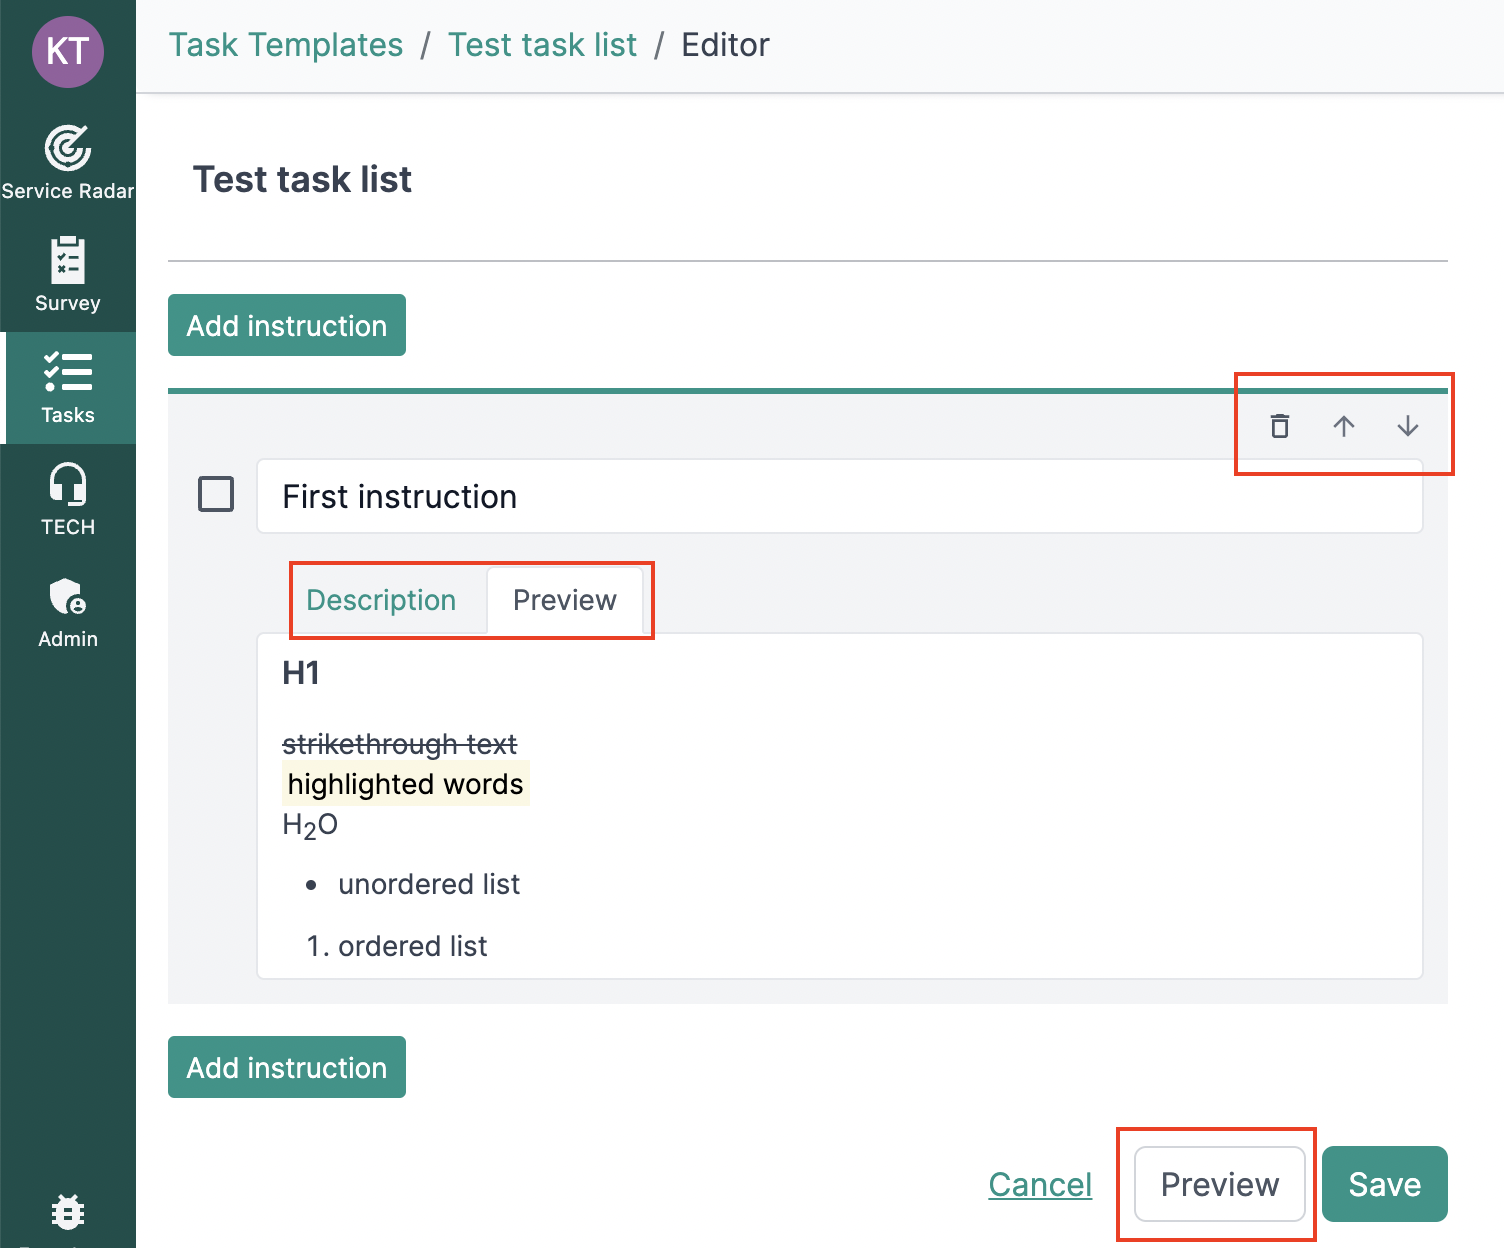
In the editor, you can add, remove and reorder instructions in the task list. Preview individual instructions or the whole list.
- Title: plaintext only
- Description (optional):
You can have up to 25 instructions per task list. Split into multiple task lists if you need more than 25.
Creating Tasks Lists - Tutorial
43 STEPS
1. Open DeskDirector Admin Portal and click Tasks.
2. To create a new task list, Click New Template.
3. Type a name for your task list.
4. You can change the visibility of this task list. Click the second radio button to limit the visibility only to agents.
5. Click the first radio button to make the task list visible to both agents and end users.
6. To add tags, click Add Tag.
7. Click the Tag that you want to add.
8. Click Create.
9. Click create task instructions to start adding instructions.
10. Type the title for the first instruction.
11. Then, type a description for the first instruction.
12. Click Add instruction to add a second instruction.
13. Type the title for the second instruction.
14. Type a description for the second instruction.
15. After you have finished adding instructions, click Save to save them.
16. Now, click the task list name to go back.
17. Click the three-dots menu.
18. Click Settings.
19. We can restrict which companies can access this task list. To do this, click the three-dots menu.
20. Click Add companies.
21. Select the companies you want. Let's choose Blade Organics.
22. Let's also add Deed and Viper.
23. Click Select to confirm.
24. Click Update.
25. Currently, there are no Request Types that use this task list. So, let's add it to one.
26. Click the Admin icon.
27. Click Portal.
28. Click Request Types.
29. Click Request Type Item.
30. Choose which Request Types you want to add the task list to. We will choose App crashing incident.
31. Scroll down and click Add Templates.
32. Click the task list we created.
33. Click Select.
34. Click Save to save the changes.
35. Now, agents and end-users can see the task list in the tickets of this Request Type.
36. You can also add this task list to individual tickets. Go to the tickets section and click on any ticket.
37. Click the gearbox icon in the Tasks section of the ticket.
38. Click Create by template.
39. Click the task list we created.
40. To limit its visibility to only agents, select the checkbox next to this option.
41. Click Select.
42. Our task list is now added to this ticket.
43. That's it. You're done.
