Getting Started with DeskDirector
Admin Console
Admin Console : Getting Started
Portal
Settings
Profile
Branding your DeskDirector Portal via Brand Packages
Color Theming a Portal via Brand Packages
Avatars in the DeskDirector Portal
Features
Enable/Disable Chat Callback Feature
Enable/Disable Pre-Ticket Chat
Enable or Disable the 'Something Else' Option
Embedding Media as the Help Page
User Groups
File Storage
Tickets
Permissions
Portal Permissions in DeskDirector
FastTrack in DeskDirector
Setting Up and Using the VIP Priority
How to setup the Flag feature (ConnectWise)
Have Approvals go to Approvers according to site (ConnectWise)
Quotes (ConnectWise)
Invoices (ConnectWise)
Request Types
Setting up Request Type Items
Request Type Ordering in the Client Portal
Getting Started with Service Groups
Forms
Getting started with DeskDirector Forms
DeskDirector Forms - Question Types in Detail
DeskDirector Forms - Dynamic Fields
DeskDirector Forms - Dynamic Fields Implementation Example
DeskDirector Forms - Sections and Conditionals
DeskDirector Forms - Embed content
DeskDirector Forms - Replace Summary Field with Title Automation
Importing Wufoo Forms to DD Forms
DeskDirector Forms - Dynamic content
DeskDirector Forms - Field value format for automation
Companies
User Groups
Managing Companies in DeskDirector
Filtering Companies to Manage
Exporting Companies as CSV
Contacts
Managing Contacts in DeskDirector
Exporting Contacts as CSV
Ticket Group Permissions
Contact Impersonation
Menu Group
Menu Items
Intro to Menu Items
Creating Menu Items
Extension Menu Security and Query Paramaters
Adding BiggerBrains Menu Item
Learning Center
Getting Started with the Learning Center
How to change the name of the Learning Center
Useful Learning Center Tips - Adding files from Google and Dropbox
Notebooks
Portal Access
Notifications
Desktop Installer
Feature Preview
Tech
Email Notifications Overview
Setting up Global Email Notification Settings
Setting up Office 365 Mail Delivery
Setting up SMTP Server Mail Delivery
Setting up SendGrid Email Delivery
Getting Started with Email Template Engine - DeskDirector
Creating Custom Email Template
Setting Email Templates for Notification Events
Email Templates Auto Login Link
HTML Email Templates - ConnectWise
HTML Email Templates - Autotask
ConnectWise - Avoid Aggressive Notifications
Troubleshooting email delivery issues using "Delivery History"
System
Feature Configuration
Default Ticket Board and Source
Setting up your Approval Statuses
Adding a VIP Priority via the Admin Console
Automatic Contact Creation
Setting Reopened Ticket Status
Setting Status when Ticket is Closed
Change Ticket Status when Customer Adds Note
Hosts Configuration
PSA Integration (ConnectWise/Autotask)
Setting Office Hours
Enabling OAuth (Microsoft Login) for DeskDirector Portal
Logging in with Passwordless
Global Magic Token: Logging in via URL
Client Portal Office365 Single Sign-On
Switching from Custom Application OAuth to the new OAuth
Integrations
ConnectBooster
Wise-Pay
QuoteWerks
ConnectWise Sell (previously Quosal)
How to configure ConnectWise Sell (previously Quosal) Order Porter integration
Adding ConnectWise Sell (previously Quosal) Order Porter Link to Opportunity
Microsoft Flow (Power Automate)
Get started with the DeskDirector Power Automate Connector
Power Automate Administration
Power Automate Template Gallery
Featured Solution: Teams Ticket Discussion
Featured Solution: Ticket Briefing
DeskDirector Connector Triggers
Action: Create an email from template
Power Automate Connector - Setting up your first flow
Getting Support for the DeskDirector Connector for Power Automate
Advanced
Deleting Orphaned Tickets
Developer Corner
Workflows
Managing Webhooks
ConnectWise API Integration Tester
Autotask Data Sync
Diagnose Entities Tool
Analytics
Account
Surveys
Task Lists
Service Agent Change Log
Auditing and Analytics
Contact Authentication Audit Log
Tech Portal
Tech Portal : Getting Started
Tickets
Managing Tickets from the Tech Portal
Tech Portal Ticket Details
Creating a Ticket from the Tech Portal
Request more information (forms request) with Task Forms
Enable/Disable Time Entry Timer Autostart
Broadcasts
Chat
Getting Started with DeskDirector Chat
Handling Chat Requests
Viewing Chat History from the Tech Portal
Creating a Chat Session from the Tech Portal
Changing your Presence
"Pre-Ticket Chat" Feature
"Call me Back" Feature
Macros
Notifications
Client Portal
Client Portal : Getting Started
Contact Support
Creating a Ticket from the Client Portal
Submitting a Generic Ticket
Creating a Chat Session from the Client Portal
Viewing Chat History from the Client Portal
Tickets
Approvals
Quotes & Invoices
Learning Center
BiggerBrains
Notifications
A walk through all the fields available in DeskDirector forms
Logging in to DeskDirector Workflow
Deskdirector - Sign up walk through
DeskDirector Roles and Permissions
Features
Tickets & Chats
Notifications & Broadcasts
Custom Forms & Request Types
Custom Branding
Custom Menus
Custom Email Templates
Surveys in DeskDirector
Approvals in DeskDirector
Easy Integrations
Advanced Authentication. No password, Single Sign On, MFA and beyond?
BiggerBrains & Learning Center
Analytics
Other DeskDirector Features
Ticket Dynamic Contents
How Tos & FAQs
APIs and Integration
ConnectWise SOAP API credential
Creating an Integrator Login in ConnectWise (SOAP API)
Creating a ConnectWise RESTful Integrator API Key
ConnectWise 2019.5+
Autotask integration major update 2022
ConnectWise Member Impersonation
Autotask Resource Impersonation
Creating an Integrator API Resource in Autotask
Autotask 2020.3 integration (API) resource migration
Third-party integration with DeskDirector
Authentication
How User Authentication works in DeskDirector
Setting/Resetting a Contact's Password
Logging in with Active Directory
Desktop Portal
Desktop Portal v4 Installation - For the Legacy App
Diagnosing DeskDirector Desktop Portal Issues
Diagnosing automatic login issues (ActiveDirectory) using the DDGetSID CLI tool
Antivirus Blocking DeskDirector Portal Installation
Troubleshooting your DeskDirector Portal installation
DD Portal for Mac: Labtech Deployment Guide
DDPortal removal tool - uninstalling Windows portals
Deploying DD Desktop Portal v5 via PowerShell
Desktop Portal v5 Installation & Common Issues
Instance & Account Queries
Setting up your custom domain
Contact Limits FAQs
Finding out what server your DeskDirector instance is on.
How search works in DeskDirector products
Portal and User Issues
User can't log in
DeskDirector Portal Browser Support
Contact can't login portal, the contact is missing in admin console but it is in ConnectWise
DeskDirector Tech Portal - How to take advantage of browser tabs
Add DeskDirector Tech Portal as a Custom Menu item inside ConnectWise Manage
Sign in with Microsoft Issue in Tech or Admin Console - "Need Admin Approval"
How do I add Tech Members/Contacts/Companies to my DeskDirector instance?
Time Stamps in DeskDirector Portal
Missing contacts or companies in DeskDirector but they are in my PSA
User Group FAQs
Chat permission granted but "Chat" option is missing on "Contact Support" page
How do we set a landing page for the client portal?
Tickets
User can't see "All Tickets" option
Tickets are missing in DeskDirector but they are on my PSA
My customer is seeing deleted tickets in portal
Ticket Description missing on ConnectWise emails
Other Articles
Top 10 Request Types
Generic vs Customized Request Types
Using Markdown
Desktop Portal (Installed client) Vs. Web Portal (Web Client)
Outdated Articles
Common WuFoo errors
Changing the Summary of Wufoo Tickets
Creating Your First Wufoo Form
Adding Wufoo Forms To Request Support
Getting started with WuFoo Forms
Debugging Your Wufoo Integration
Switching PSA or merging with another CW/AT instance
How to Allow Time Entries for StreamlineIT Members
Essential and Dynamic Plan Breakdown
Advanced Use
Generative AI
DeskDirector with Generative AI
Setting up AI Service Providers
Ticket Summary for Tech Portal
Custom Tools for AI Assistants
Knowledge Bases for AI Assistants
DeskDirector API
Subscribing to Chat Webhooks
Portal Deep Linking
Webhook Example with Zapier
Chat Session Payload
Legacy URL Linking in DeskDirector
Get started with portal extension page demo
Dynamic content based on logged in user
Clean Tickets
Exporting Portal Usage
TimeZest integration with DeskDirector
Troubleshooting Connectwise/Autotask-related integration issues
Release Notes
Client Portal
Server
Tech Portal
Portal Release Notes - Windows/macOS
Differences Between different Desktop Portal version
Portal Release Notes - Web Client
Release Notes in the Admin Portal
Glossary
Security
Microsoft Teams App
Introducing the DeskDirector for Microsoft Team App
Setting up Content Security Policy (CSP)
Installing the Microsoft Teams App (Tech)
Setting up Tags for Teams Discussions (Tech)
Setting up DeskDirector for Microsoft Teams for your clients (Client mode)
Branding the DeskDirector Teams App
DeskDirector Teams App Notifications
User Groups Integration with Microsoft Teams
Troubleshooting
Advanced topic: Setting up Tech & Client Mode in the same tenancy
Integrating Microsoft Teams with DeskDirector Tech Portal
Smart Alerts for Tech Users
Release Notes - DeskDirector Teams App
Contact Support
- All Categories
- Advanced Use
- Generative AI
- Custom Tools for AI Assistants
Custom Tools for AI Assistants
Updated
by Andy Chen
Empower your DeskDirector AI Assistants with Custom Tools (also known as plugins) to perform a wide range of actions, from interacting with external services to executing specific operational tasks. This guide will walk you through setting up, assigning, and testing custom plugins to extend the capabilities of your AI Assistants.
Setting Up a Custom Tool
Follow these steps to create a new custom tool for your AI Assistants.
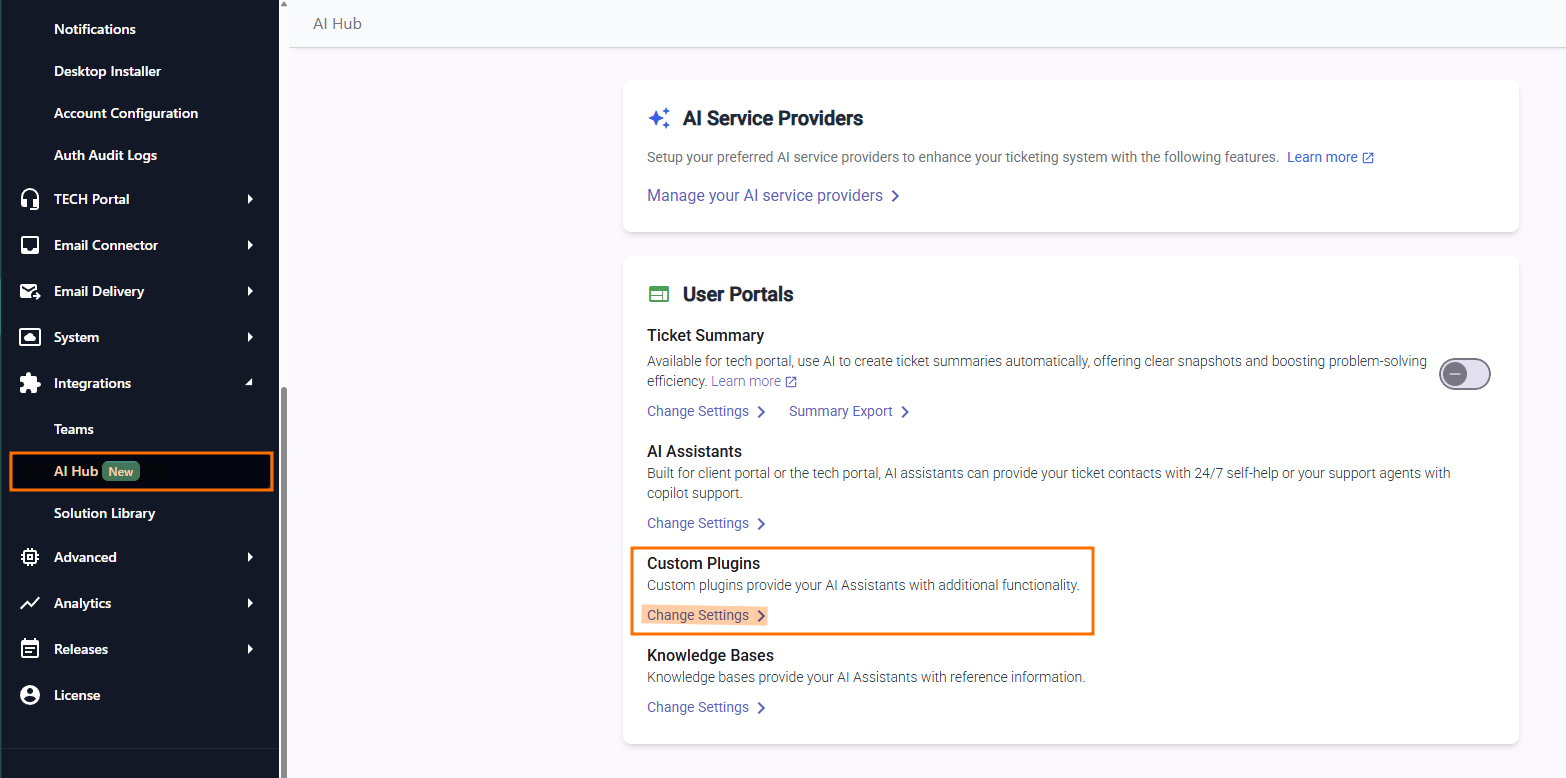
- Navigate to AI Services Settings: In your Admin portal, go to the AI Services settings page.
- Access Custom Plugins: Under the Custom Plugins section, click on Settings.
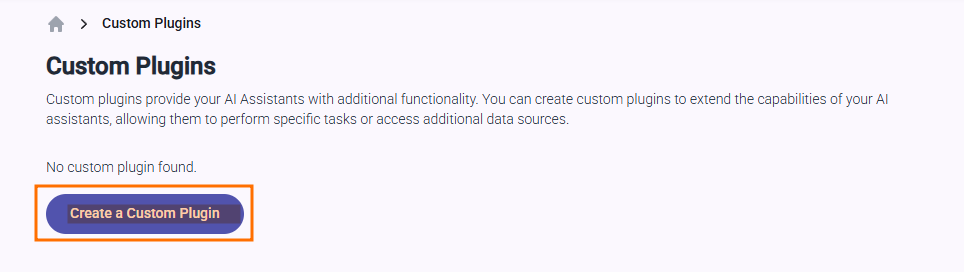
- Initiate Creation: Click the Create a Custom Plugin button to begin the setup process.
You have two primary methods for defining the operations your plugin can perform: importing an OpenAPI document or creating operations manually.
Option 1: Import an OpenAPI 3.0 Document
If you have a pre-existing OpenAPI 3.0 specification for your tool, you can import it directly.
- Click the Choose File button.
- In the pop-up dialog that appears, select the specific operations you want to enable for the AI Assistant. This is a crucial step to control and limit which actions the assistant can take, ensuring it only has access to necessary and approved functions.
Option 2: Create Operations Manually
You can also build your tool's functionality from the ground up by adding individual operations.
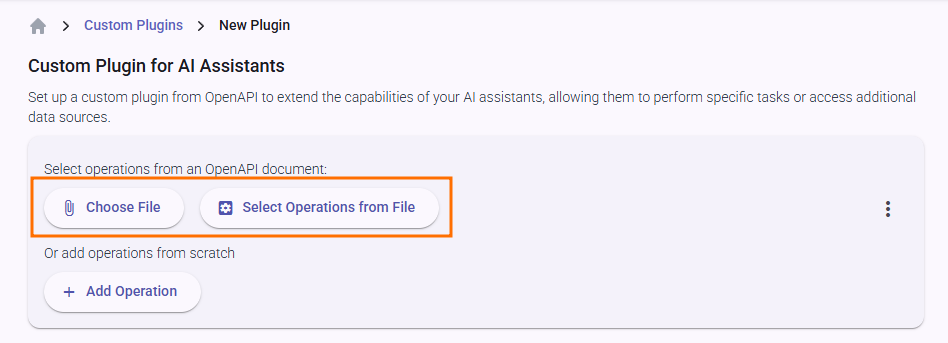
- Click the Add Operation button.
- Fill in the following details for each operation:
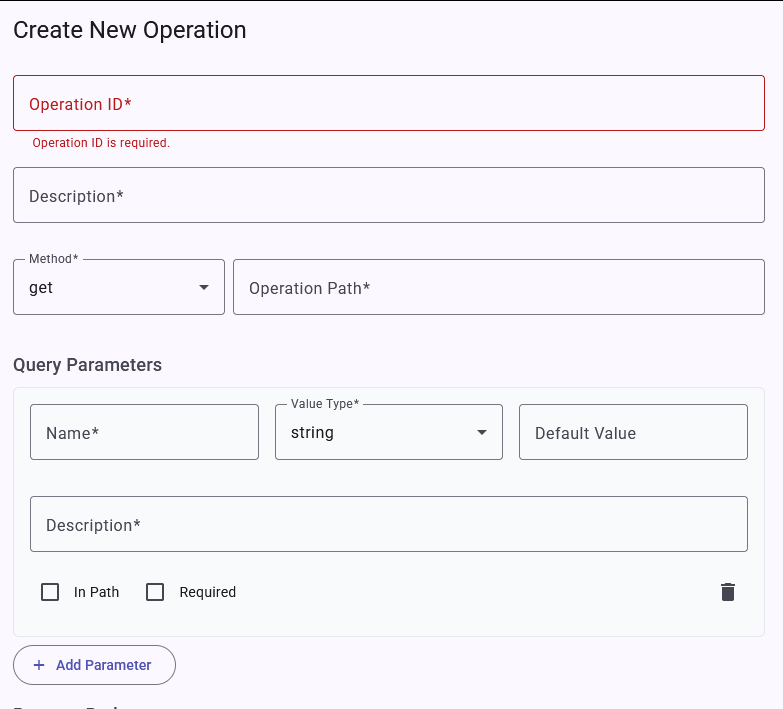
- Description (Required): Provide a clear and concise description of what the operation does. This description is vital as it helps the AI assistant understand when and how to use this action.
- HTTP Method/Path (Required): Define the HTTP method (e.g.,
GET
,POST
,PUT
,DELETE
) and the API endpoint path. - Query Parameters (Optional): Add any necessary query parameters for the request.
- Request/Response Body Examples (Optional): Specify example bodies for both the request and the response. These examples help the system generate the necessary schemas for the AI to understand the data structure.
Finalizing the Plugin
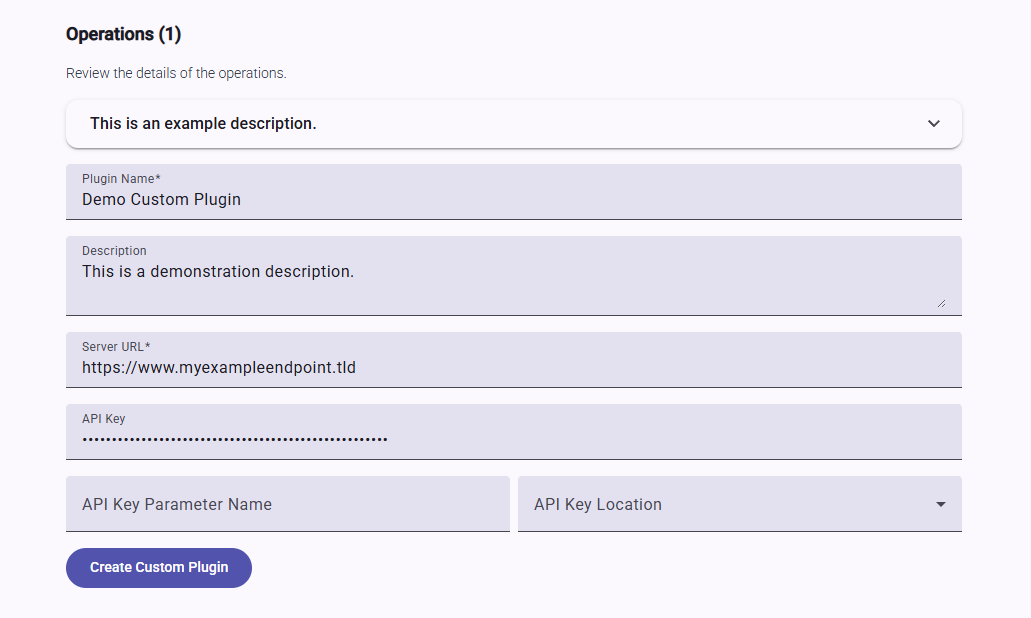
After defining your operations, complete the following fields:
- Plugin Name (Required): Give your plugin a descriptive name that the AI assistant can recognize.
- Server URL (Required): Enter the base URL for the API. Ensure this is a valid and accessible address pointing to your server or service provider.
- Authentication (Highly Recommended): Secure your tool by setting up authentication. API Key authentication is supported and is the recommended method to ensure that only authorized requests are processed.
Once all details are configured, click Create Custom Plugin to save your new tool.
Assigning and Testing Your Plugin
After creating a plugin, you need to assign it to an AI assistant and test its functionality.
- Return to AI Services: Go back to the main AI Services page.
- Select an AI Assistant: Navigate to AI Assistants and choose the assistant you wish to enhance.
- Assign the Plugin: In the Basic Settings tab for the selected assistant, find the Plugins section and select one or more of your custom plugins from the list.
- Update Chat Instructions: Go to the Adjust Chat Settings tab. This is a critical step. You must update the chat instructions to inform the AI assistant about the new tool and how to use it effectively. Provide clear guidance on when to trigger the plugin and what kind of user queries it can handle.
- Test the Plugin: Move to the Test Chat Settings tab. Engage in a conversation with your AI assistant to test the new functionality. Try different prompts to ensure the plugin is triggered correctly and behaves as expected.
- Save Your Changes: Once you are satisfied with the configuration and testing, go to the Review & Save tab to apply all your changes.
Best Practices for Creating Effective Plugins
To ensure your LLM-powered AI Assistant can use your custom tools reliably and effectively, follow these best practices:
- Write Clear, Descriptive Names and Descriptions: The AI relies heavily on the names and descriptions you provide for both the plugin itself and its individual operations.
- For Operation Descriptions: Be explicit about what the function does, what inputs it needs, and what it returns.
- For Parameter Descriptions: Clearly describe each parameter. For example, for a parameter named
ticket_id
, the description could be "The unique numerical identifier for a support ticket."
- Use Specific, Atomic Operations: Create single-purpose functions rather than one complex function that does multiple things. For instance, have separate operations for
get_ticket_details
,update_ticket_status
, andadd_note_to_ticket
rather than a singlemanage_ticket
function. This makes it easier for the AI to choose the correct tool for a specific task. - Provide High-Quality Examples: The request and response body examples you provide are used to generate the data schemas. Ensure your examples are accurate and representative of the real-world data the tool will handle. This helps the AI understand the expected data formats.
- Handle Errors Gracefully: Design your API to return meaningful error codes and messages. When the AI receives a clear error (e.g., "404: Ticket not found"), it can provide a more helpful response to the user instead of failing silently.
- Iterate and Refine: Building effective tools for an LLM is an iterative process. Test your assistant with various prompts, observe its behavior, and refine your operation descriptions, instructions, and examples based on the results.
Advanced
Using an OpenAPI Editor
For creating complex plugins with multiple operations and detailed data structures, we recommend using a third-party OpenAPI editor (like Swagger Editor or Stoplight).
Using an external editor allows you to construct a comprehensive OpenAPI 3.0 specification with well-documented schemas for your request and response bodies. While our user interface currently generates schemas based on the examples you provide, a dedicated editor enables you to add detailed descriptions, constraints, and types for each field. This level of detail provides the AI with a much richer understanding of the API's requirements, leading to more accurate and reliable tool usage.
Once your OpenAPI document is complete, you can easily import it into DeskDirector using the "Choose File" option during the plugin creation process.