Table of Contents
Permissions & Feature Configuration
 Updated
by Niamh Ferns
Updated
by Niamh Ferns
Feature Configuration Overview
Permissions Overview
The DeskDirector Admin Portal allows you to set very specific permissions/filters in regards to what your clients can see and access.
Permissions can be set at a global, company, and contact level which uses a cascading override approach. This means that Global Permissions are overridden by Company level permissions, which in turn is overridden by Contact level permissions. This article will guide you through setting up permissions.
Global Permissions
Here is where you set global permissions which will control what features are globally available to your contacts. Global permissions apply to all of your contacts and have the lowest priority in the override.
To get started, login to the admin console, then head to Client Portal > Global Settings > Features > General. You can enable the features you want for all of your contacts by ticking the boxes beside them.
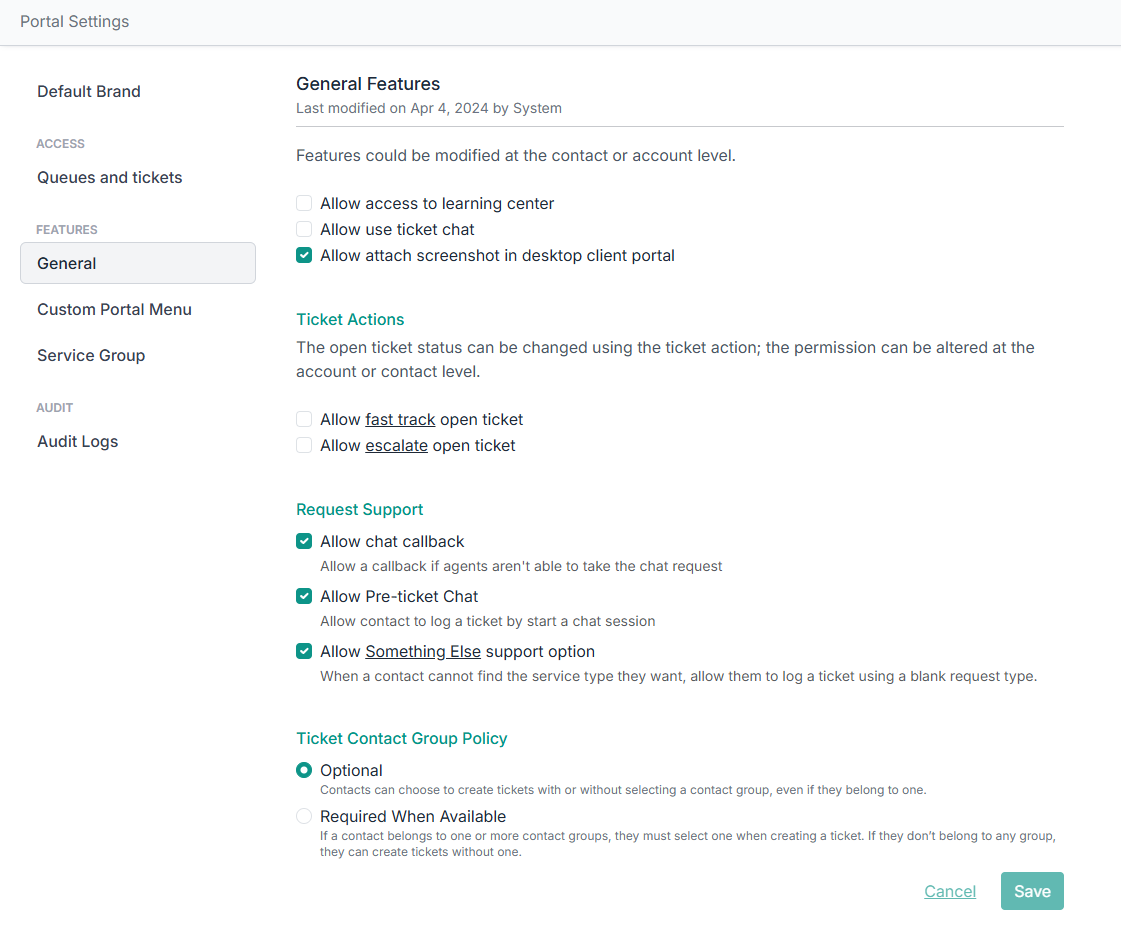
Portal > Global Settings > Feature Permissions.- Allow access to learning center : Allows users to access the Learning Center.
- Allow use ticket chat: Allows users to make use of real-time chats with Service Agents
- Allow attach sceenshot in desktop portal : Allows users to take a screenshot of their screen when adding an attachment to a ticket. (This will only work on the Desktop Portal.)
Ticket Actions
- Allow fast track open ticket : Allows users to FastTrack tickets. This only grants users the ability to use this feature; you must configure FastTrack separately.
- Allow escalate open ticket : Allows users to escalate their tickets directly.
Request Support
- Allow Pre-ticket Chat: Allows users to create a pre-ticket chat.
- Allow chat callback: Allows users to request a callback through chat.
For PSA Partners Only
- All Tickets : When enabled, this allows users to view tickets that are assigned to any contact in their company. This also enables users to change the contact or summary of a ticket.
- Quotes: Allows users to view quotes.
- Invoices: Allows users to view invoices.
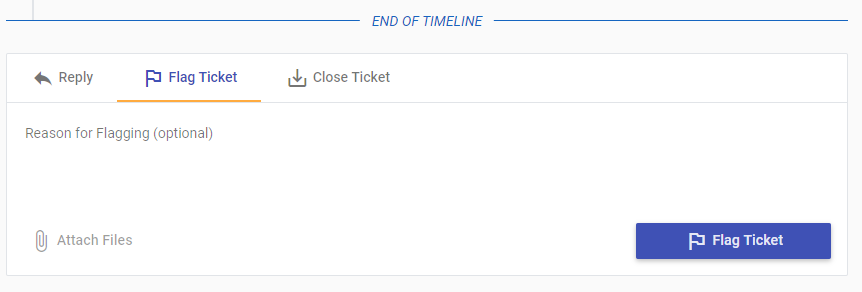
- Flag : (ConnectWise only) Allows users to flag a ticket for review. Flagging creates an activity inside ConnectWise for the user's account manager.
- Access to ConnectWise Site tickets : User with this permission will be able to view and modify site tickets, also able to filter by site tickets
Account Permissions
To setup company permissions navigate to Client Portal > Accounts, click on a company account you want to set permissions for, then head to Features > General tab. You will see the same items here that appeared in the Global Portal Permissions.
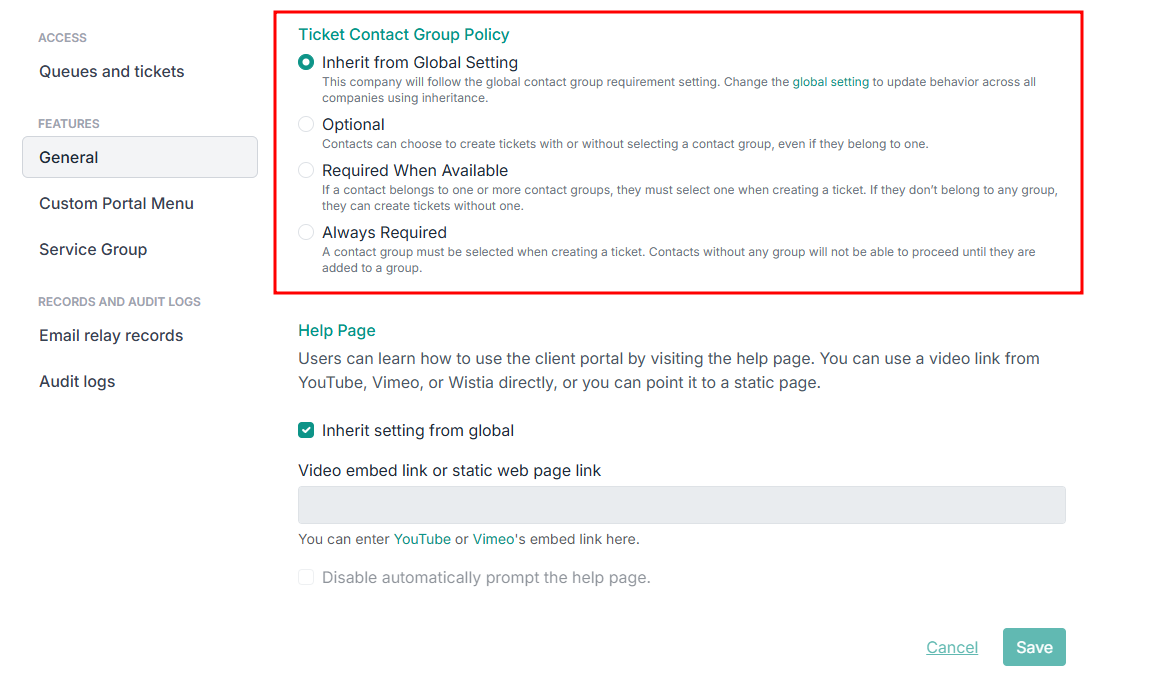
Account permissions apply to all of your contacts under a specific account and override any global permissions. You set whether you want to override or inherit behaviour by selecting an option under Ticket Contact Group Policy:
Contact Permissions
Lastly, fine tuning permissions is done via Contact permissions. Any configuration here apply to a specific contact and override both global and company permissions.
To setup permissions for a contact navigate to Client Portal > Contacts, and select a contact. Now head to Features > General.
PSA Partner Contact Permissions
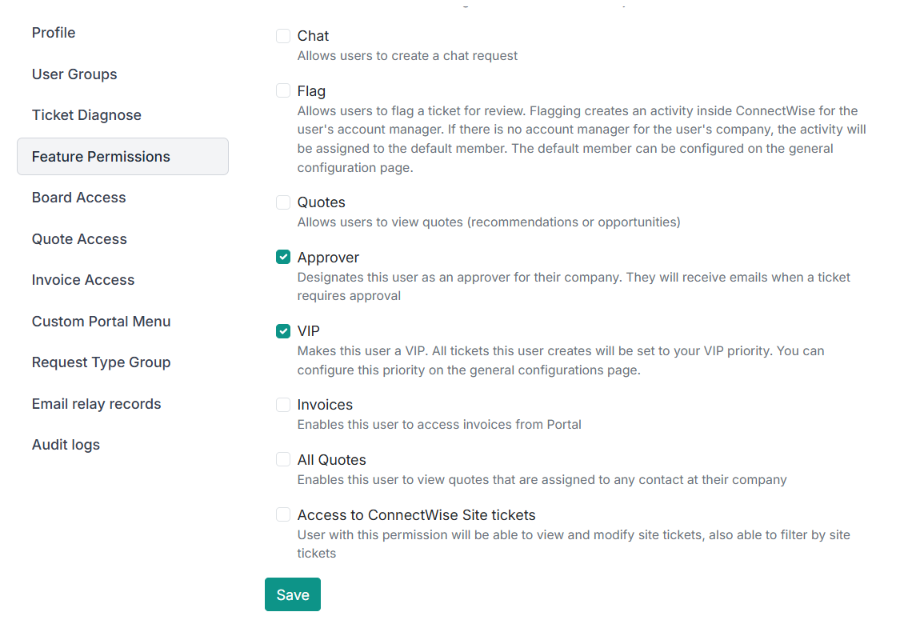
- Approver: Designates this user as an approver for their company. They will receive emails when a ticket requires approval
- VIP : Makes this user a VIP. All tickets this user creates will be set to your VIP priority. You can configure VIP priority on the general configurations page.
- Invoices : Enables this user to access invoices from Portal
ConnectWise only
- All Quotes : Enables this user to view quotes that are assigned to any contact in their company
- Access to ConnectWise Site tickets : Only applicable if the user has the all tickets permission. This restricts the tickets they can see to only contacts at their own site
Enabling Fast Track Permissions
FastTrack permissions follow cascading override.
- You can easily FastTrack Flag permissions globally under
Portal>Global Settings>Feature Permissionsthen tick or untick the Flag option. This enables/disables FastTrack for every contact in your instance. - To setup the FastTrack permission for each company, head to
Portal>Companiesthen select the company you want to control the FastTrack permissions for. Go to theFeature Permissionstab and enable the "Override global permission settings" toggle to allow you to change the FastTrack settings to be different from the global settings. - To fine tune the FastTrack permissions further, you can set it at a contact Level. Just head to
Portal>Contactsthen select the contact you want to control the FastTrack permissions for. Click on theFeature Permissionstab and enable the Override toggle. This will override both global and company permissions.
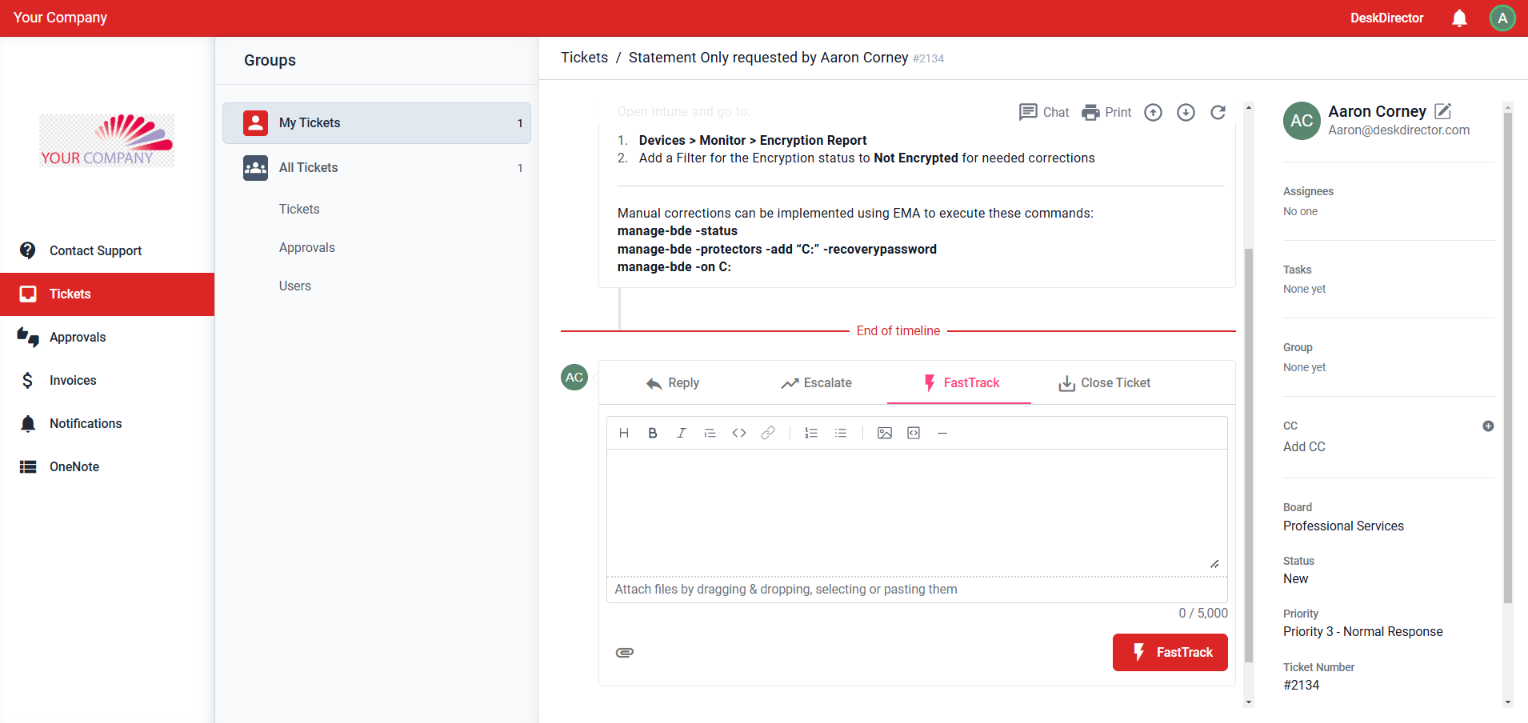
Contacts with the FastTrack permission will now be able to FastTrack tickets they have access to in the Portal. Here's what that looks like:
Setting Contacts as VIP
DeskDirector's VIP system is a great way for you to make sure important people at your clients' companies get the fastest response and offer the best service you can.
VIP works by assigning a VIP priority in DeskDirector. After this is set up, you select and give the correct VIP permissions to your VIP contacts. When a VIP contact submits a ticket through DeskDirector, regardless of the status the ticket is set to come in under (set in the Service Type), it will instead come in under the VIP status.
You can easily assign which of your contacts have VIP permissions. To get started, login to your DeskDirector Admin Portal then head to Portal > Contacts then select the contact you want to set as VIP then head to the Feature Permissions tab of that contact and tick the VIP box.
Don't forget to save the changes.
Ticket Flagging
For ConnectWise partners, users can flag a ticket for review. Flagging creates an activity inside ConnectWise for the user's account manager. If there is no account manager for the user's company, the activity will be assigned to the default member. The default member can be configured on the general configuration page.
This page will take you through the steps in setting up the Flag feature for your clients.
Enable Flag Permissions
Enabling flag permissions adheres to the cascading override system.
- You can easily setup Flag permissions globally under
Portal>Settings>Permissionsthen just tick or untick the Flag option. This enables/disables flagging for every contact in your company. - To setup the Flag permission for each company, head to
Portal>Companiesthen select the company you want to control the Flag permissions for. Go to thePermissionstab and enable the Override global permission setting toggle to allow you to change the Flag settings to be different from the global settings. - To fine tune the Flag permissions further, you can set it at the contact level. Just head to
Portal>Contactsthen select the contact you want to control the Flag permissions for, then click on thePermissionstab. This will override both global and company permissions.
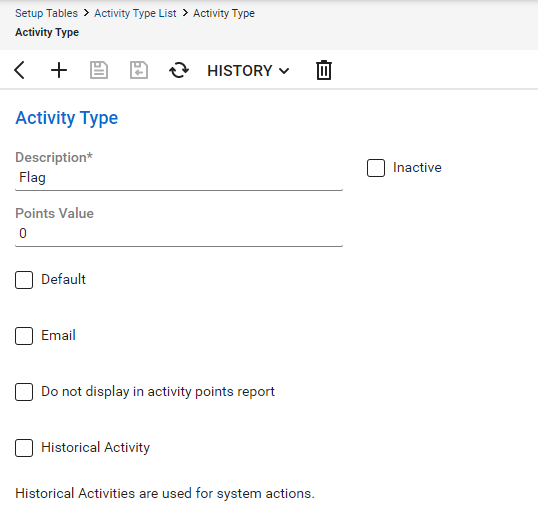
Creating the Flag Activity Type in ConnectWise
- Login to ConnectWise
- Head over to
System>Setup Tables>Activity Types - Create a new activity called "Flag"
Confirm API Member Permissions
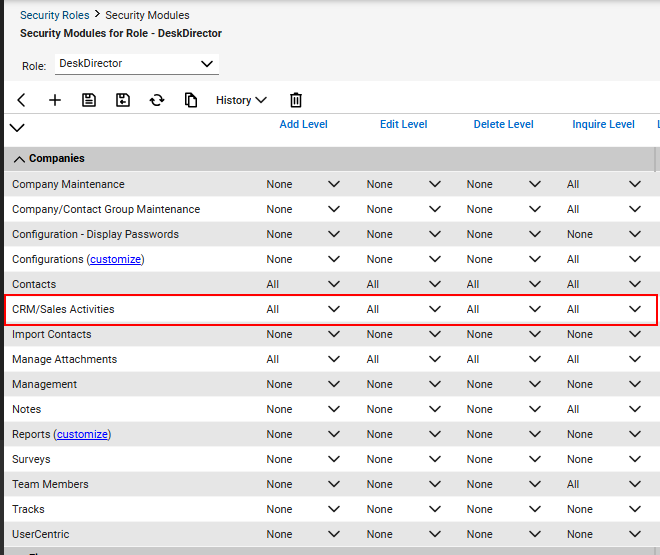
- Login to ConnectWise
- Head over to
System>Security Roles - Select your DD API security role
- Enable all permissions under
Companies>CRM/Sales Activities
After all of this, tickets can now be flagged by contacts in the Client Portal: