Getting Started with DeskDirector
DeskDirector Portals
Browser Support
What is the DeskDirector Admin Portal?
What is the DeskDirector TECH Portal?
What is the DeskDirector Client Portal?
Desktop Portal
Managing Your Account
Pricing & Subscription Plans
Deskdirector - Sign up walk through
Managing your DeskDirector Subscription
Admin Essentials
Release Notes
Permissions & Feature Configuration (ConnectWise/Autotask Partners)
Automatic Contact Creation
The Developer Corner
DeskDirector Features Overview
Logging in to DeskDirector
Desktop Portal Version Differences
Managing Tickets with DeskDirector
User Profiles & Profile Pictures
Office Hours
How Searching Works
Embedding Help Page Media
Get started with the DeskDirector Power Automate Connector
Features
Portal Customization
Service Catalogue
Forms
Communication
Actionable Messages for Emails
Real-Time Chats
Notifications
Email Notifications
Email Template Engine
Surveys
Broadcasts
Generative AI
Ticket Summary for TECH Portal
DeskDirector with Generative AI
Setting up AI Service Providers
AI Assistants in DeskDirector
Custom Tools for AI Assistants
Knowledge Bases for AI Assistants
Set up Microsoft Foundry Agent Service with DeskDirector Portals
Advanced
Login & Authentication
Contact Groups
Accounts and Companies
Contacts
Approvals
Task Lists
The Learning Center
Tags
Custom Domains
File Storage
Portal Deep Linking
Service Dashboard
Auditing and Analytics
Integrations
ConnectWise
ConnectWise Custom Menu Item for DeskDirector Tech Portal
ConnectWise
ConnectWise Quotes & Invoices
ConnectBooster
ConnectWise - Avoid Aggressive Notifications
AutoTask
Switching or Merging PSAs
QuoteWerks
Wise-Pay
TimeZest
BiggerBrains
OneNote Notebooks
Integrations - Frequently Asked Questions
IT Glue
Microsoft Teams App
Introducing the DeskDirector for Microsoft Team App
Installing the Microsoft Teams App (Client Mode)
Installing the Microsoft Teams App (TECH Mode)
Setting up Tags for Teams Discussions (TECH Portal)
Branding the DeskDirector Teams App
DeskDirector Teams App Notifications
User Groups Integration with Microsoft Teams
Setting up Content Security Policy (CSP)
Advanced topic: Setting up Tech & Client Mode in the same tenancy
Integrating Microsoft Teams with DeskDirector Tech Portal
Smart Alerts for TECH Users
Microsoft Power Automate
Actions
Solutions
Power Automate Template Gallery
Featured Solution: Teams Ticket Discussion
Featured Solution: Ticket Briefing
Power Automate Administration
Power Automate Connector - Setting up your first flow
DeskDirector Power Platform Connector Reference
Troubleshooting
Troubleshooting via Web Developer Tools
Diagnose Entities Tool
Troubleshooting DeskDirector Connection Issues
Permissions & Access - Common Issues
Tickets & Chats - Common Issues
ConnectWise Audit Trail - Exporting API Logs
Contact DeskDirector Support
Desktop Portal - Common Issues
Contact Impersonation
DeskDirector Desktop App - Installation Issues
Login & Authentication - Common Issues
Approvals - Common Issues
Email & Email Delivery - Common Issues
PSA Entity Syncing - Common Issues
PSA Integration - Common Issues
ConnectWise Integration - Common Issues
Autotask Integration - Common Issues
Microsoft Teams App - Common Issues
Security
Glossary
Archived
- All Categories
- Glossary
- R
- Resolved Ticket
Resolved Ticket

Configuring Resolved Behaviour
Some users may not want to close the ticket at resolution, even though from their perspective, the ticket's primary issue is resolved. Even though clients see the ticket as closed, agents may still have cleanup tasks and will want to see it in an open state. The resolved state can help with this.
- In your PSA, make sure one of the tickets is in a closed (but not resolved) status.
- Optionally, you can also use a resolved status as DeskDirector's closed action in your system settings.
- In the Admin Portal, under
System>Feature Configuration>Tickets>Client Portal, enable the feature Exclude resolved from open ticket list.
Once you have done the steps above, the Client Portal will then only display resolved tickets under the closed ticket list.
ConnectWise Resolved Status
To add a new or adjust an existing status, please follow the steps below:
- Log in to ConnectWise
- Click on Setup Tables under System.
- Search for Service under the Table column
- Select Service Board
- Select one of the boards you want to set up
- Switch to the Statuses tab.
- Select existing status or click on plus to create a new status
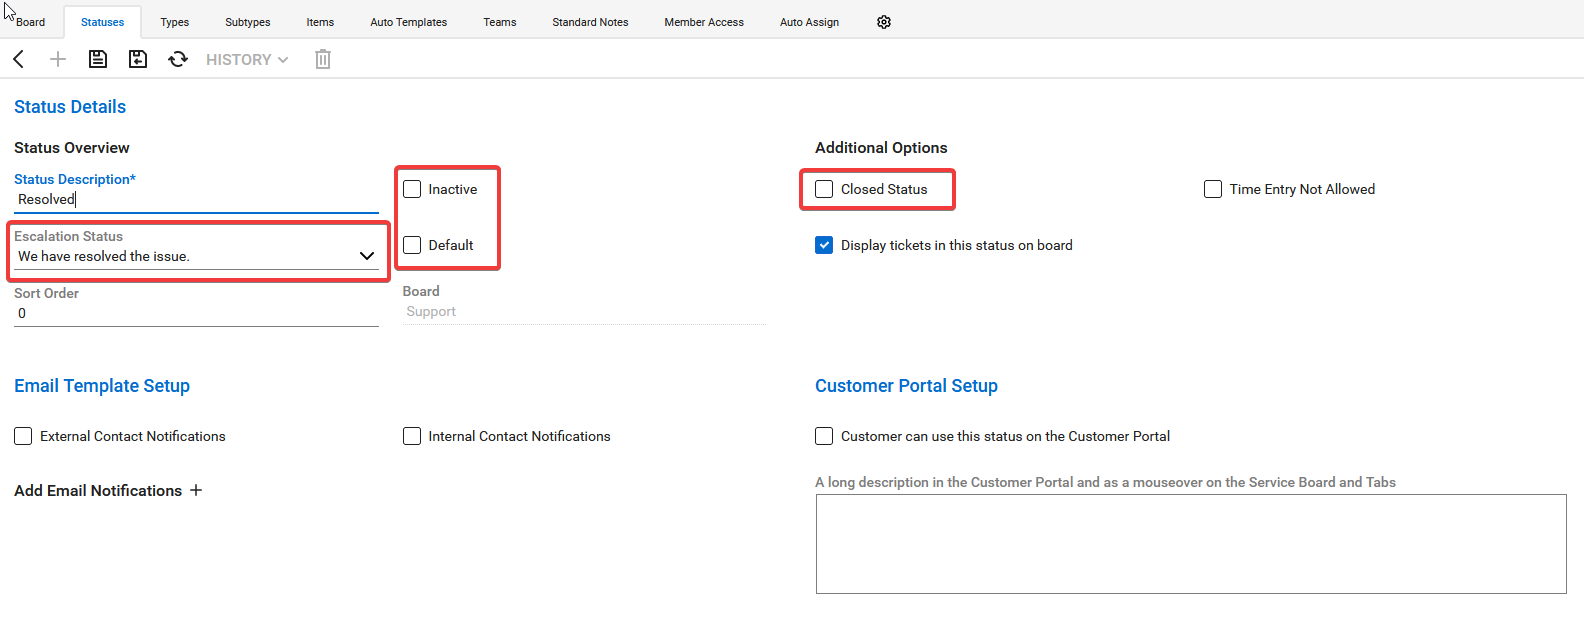
- Set the status name to Resolved
- Change Escalation Status to We have resolved the issue
- Ensure Closed Status under Additional Options should be Off
- Click on Save
Autotask Resolved Status
Before setting up a resolved status, you should be aware that Autotask has system statuses. These statuses have been set by the system and cannot be modified. They have their own unique fixed behaviour. The resolved status for Autotask is always a custom status.
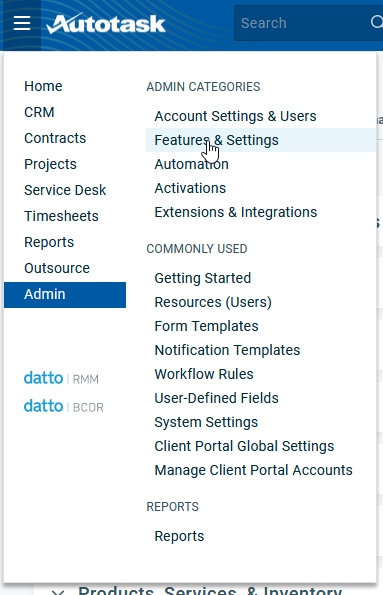
- Log in to Autotask
- Under the top left menu, select Admin, then click on Features & Settings.
- Expand the Service Desk (Tickets) group.
- Navigate to Task & Ticket Statuses
- Add new or edit existing Status. When edit status, please use a custom status.
- Select Resolved as SLA Event
For a custom status with SLA event Resolved, it will only mark the ticket as resolved, not completed. For a Completed status with SLA Resolved, it will complete the ticket instead.
- Custom Status with SLA Event Resolved: Ticket will be resolved but not completed.
- System Status with the SLA Event Resolved: Ticket will be completed instead of resolved.