Table of Contents
- Login & Authentication Overview
- Login via OAuth - Microsoft SSO
- Automatic Login via Active Directory
- Login via Email Token (Passwordless)
- Log in via Password
- Frequently Asked Questions
- OAuth Related Questions
- "Am I already using the new OAuth?"
- "How do I switch to new OAuth?"
- "Why did DeskDirector deprecate custom application OAuth?"
- "What is the issue with secret maintenance?"
- "Will DeskDirector remove Custom Application anytime soon?"
- "Do we need to adjust anything for this deprecation?"
- "How do we minimise the impact of migrating to new OAuth?"
- "What scopes will DeskDirector ask for during admin consent?"
- OAuth Related Questions
Login & Authentication
 Updated
by Niamh Ferns
Updated
by Niamh Ferns
- Login & Authentication Overview
- Login via OAuth - Microsoft SSO
- Automatic Login via Active Directory
- Login via Email Token (Passwordless)
- Log in via Password
- Frequently Asked Questions
- OAuth Related Questions
- "Am I already using the new OAuth?"
- "How do I switch to new OAuth?"
- "Why did DeskDirector deprecate custom application OAuth?"
- "What is the issue with secret maintenance?"
- "Will DeskDirector remove Custom Application anytime soon?"
- "Do we need to adjust anything for this deprecation?"
- "How do we minimise the impact of migrating to new OAuth?"
- "What scopes will DeskDirector ask for during admin consent?"
- OAuth Related Questions
Login & Authentication Overview
DeskDirector provides a plethora of methods for users to authenticate with DeskDirector's portals. In this article, we give an introduction to each of these and provide detailed steps on how to get these set up.
While the article is longer, you do not need to read it all at once. On the right-hand side, you can see each method in the table of contents.
Automatic Contact Creation
DeskDirector includes the ability for you to create contacts automatically - you can read more in our Automatic Contact Creation documentation.
Login via OAuth - Microsoft SSO
DeskDirector's client portal offers Office 365 Single Sign-On (OAuth) as the recommended login method for users. This authentication method provides a secure and convenient way for users to access the client portal using their Office 365 credentials. By leveraging OAuth, DeskDirector enhances the login experience and offers additional security features, including two-factor authentication (2FA) and the latest security protectors provided by Microsoft.
Benefits of Using OAuth for Client Portal Login:
- Enhanced Security: OAuth provides a more secure authentication method compared to traditional password-based logins. With OAuth, user passwords are not stored or transmitted directly to DeskDirector. Instead, the authentication process is handled by Microsoft's secure infrastructure. This reduces the risk of password-related vulnerabilities, such as weak passwords, password reuse, or interception of credentials.
- Two-Factor Authentication (2FA): DeskDirector leverages the 2FA capabilities provided by Microsoft through OAuth. With 2FA enabled, users are required to provide an additional verification factor, such as a unique code sent to their mobile device or biometrics, in addition to their Office 365 credentials. This adds an extra layer of security, making it significantly more challenging for unauthorised individuals to gain access to the client portal, even if the user's password is compromised.
- Compliance with Industry Standards: By utilising OAuth and integrating with Office 365, DeskDirector aligns with industry best practices and security standards. Microsoft invests heavily in securing their authentication infrastructure, ensuring that OAuth meets stringent security requirements and undergoes regular security audits and updates. By leveraging OAuth, DeskDirector inherits the robust security measures implemented by Microsoft, further enhancing the protection of user accounts and sensitive data.
- Continuous Security Improvements: Microsoft continually enhances the security features and protocols associated with OAuth. They monitor and address emerging threats, implement advanced security controls, and provide regular security updates to address vulnerabilities. By using OAuth for client portal authentication, DeskDirector customers benefit from these continuous security improvements without requiring additional effort or maintenance on their part.
Configuring OAuth
Client Portal
- Log in to your DeskDirector Admin Portal.
- Navigate to
System>Authentication>Client Portal Office365 Single Sign-On - Select Allow Office365 Single-Sign on
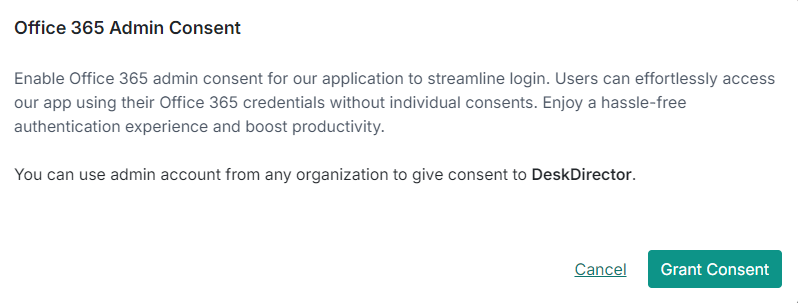
- Select the dropdown for Admin Consent and select Client Portal

- Select "Grant Consent"
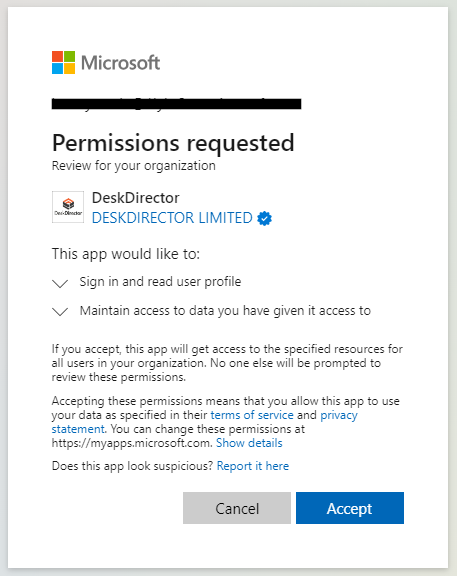
- Log in with a Microsoft service account that has admin permissions for each tenancy; it looks like this:
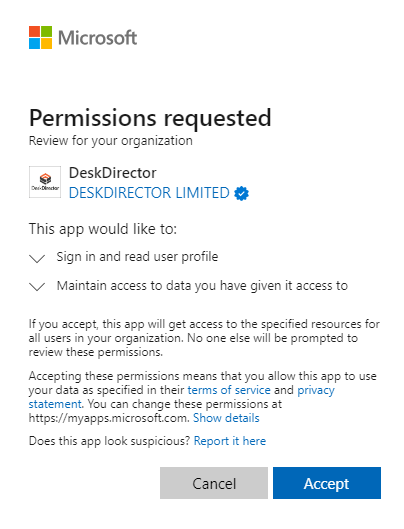
- Select Accept
If granting consent was successful, you will see the following pop-up:
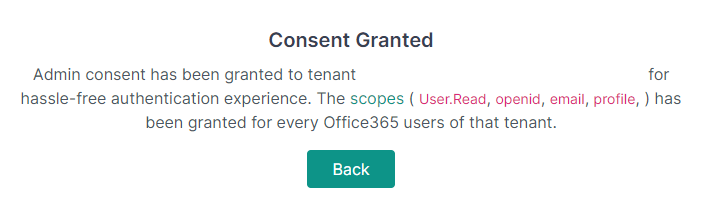
Now, contacts from this tenancy can log in to the client portal seamlessly via Microsoft SSO.
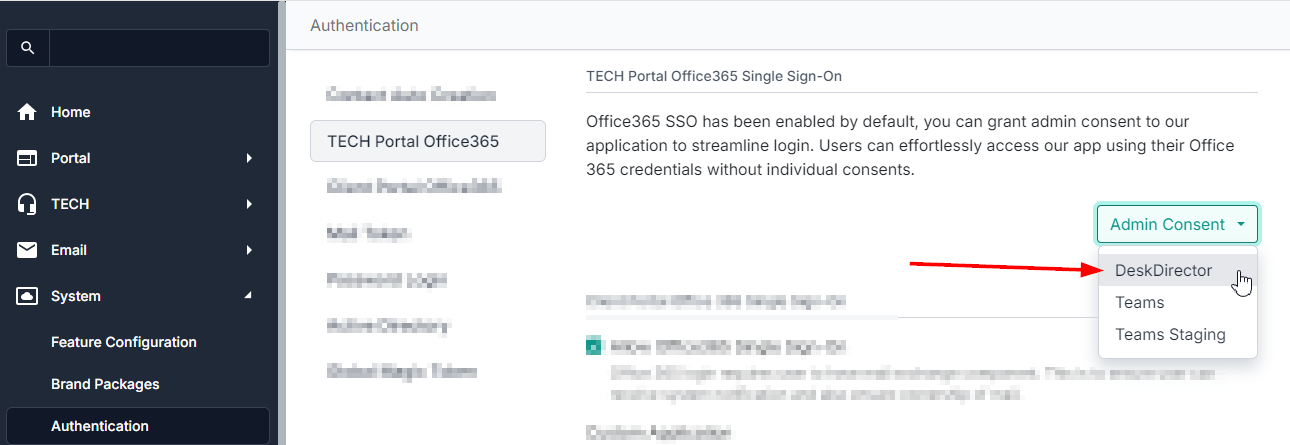
Tech Portal
- Log in to your DeskDirector Admin Portal.
- Navigate to
System>Authentication>TECH Portal Office365 Single Sign-On(For TECH Portal users only.) - Select the drop-down for "Admin Consent" and select "DeskDirector" (for Tech Portal users)For Tokity users, this will be labelled Portal and not DeskDirector.
- Select "Grant Consent"
- Log in with a Microsoft service account that has admin permissions for each tenancy; it looks like this:
- Select Accept
If granting consent was successful, you will see the following pop-up:

Now, contacts from this tenancy can log in to the Client and TECH Portals seamlessly via Microsoft SSO.
If you are still using old OAuth via a custom application, please be advised that this is no longer supported. Please see the FAQ below on how to transition to the new OAuth. Granting consent via the Client Portal option will conflict with the old OAuth method.
Automatic Login via Active Directory
DeskDirector's automatic login via Active Directory relies on 3 core components:
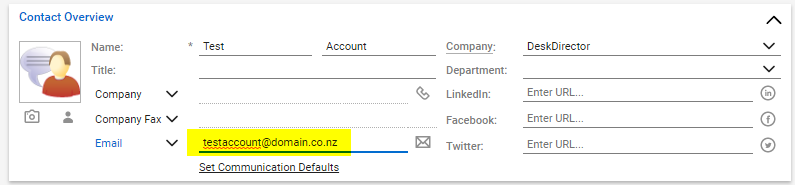
- The Domain SID
- Email address in the User's AD Profile ("Email" under the General Tab)
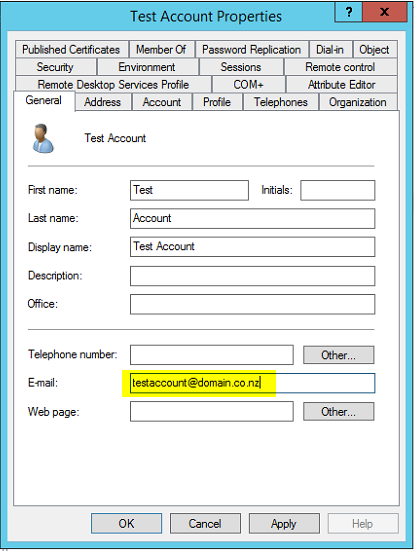
- Email address of the contact in your PSA
Automatic Login Configuration
Let's go through adding automatic login to a company in your Administration Console.
- Download the DeskDirector SID Tool.You can read more about the DeskDirector SID Tool in our Login & Authentication Troubleshooting documents.
- Next, run this tool on any machine in the user's domain. It could be an end user's computer or a server, as long as it's on the domain. Check that the domain and email address associated with the account are displaying correctly here. Copy the Domain SID using the Copy button.
- Now go to the Account's page and enter their SID and email domains:
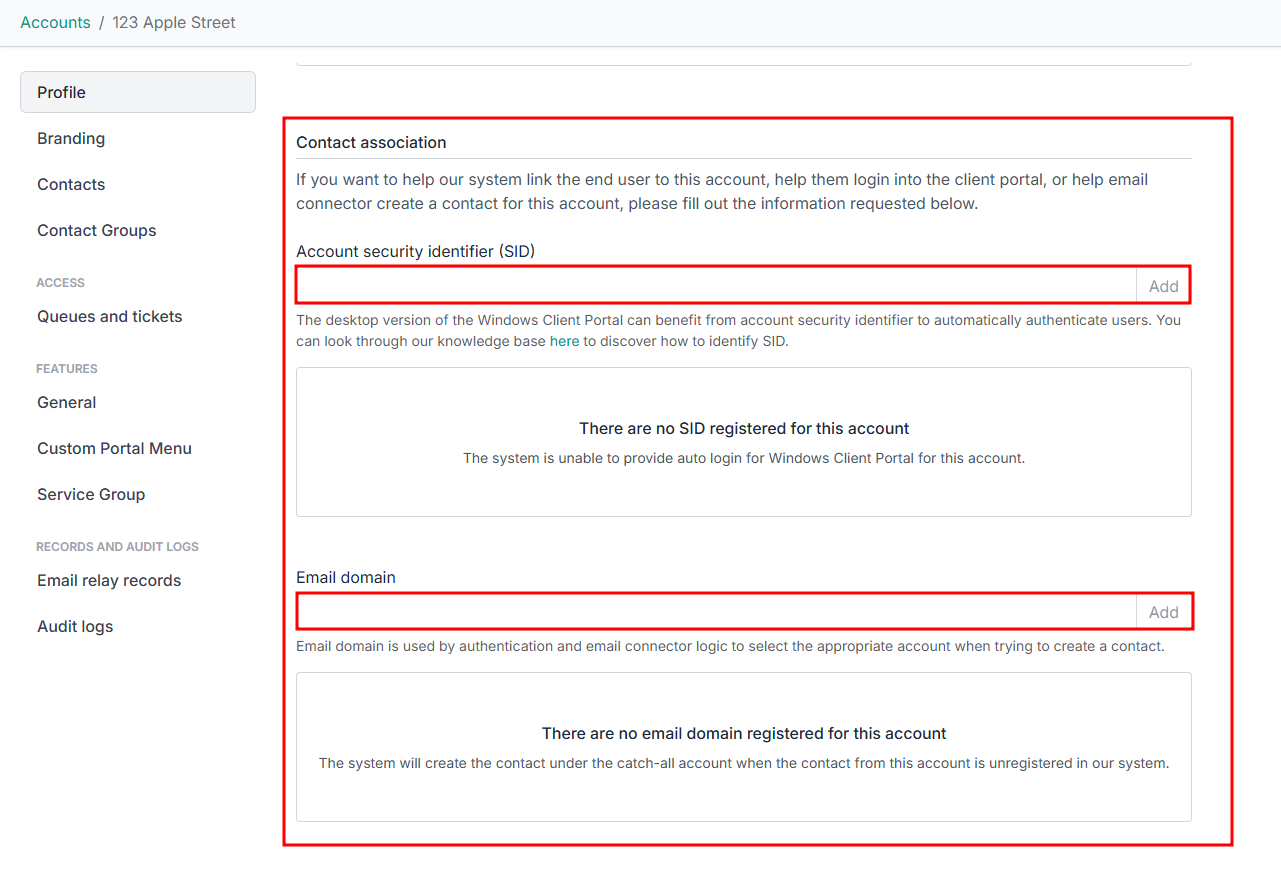
And that's it. Client portal users from that Account will now automatically log in through Active Directory.
Automatic Login Advanced Setup
It is not uncommon for larger companies that are either comprised of multiple smaller companies under a parent or that are split over different countries to have multiple companies with the same SID in DeskDirector. You may also run into situations where users are working on personal devices that are not domain-joined but would still like to log in automatically.
You can read more on handling those types of situations in our troubleshooting document.
Login via Email Token (Passwordless)
The passwordless feature allows for a backup login method in case Active Directory and SSO login fail. All they need is an email address so users can receive a token to log in in their inbox.
To enable the Passwordless feature, open the Admin Portal and head to System > Authentication > Mail Token:
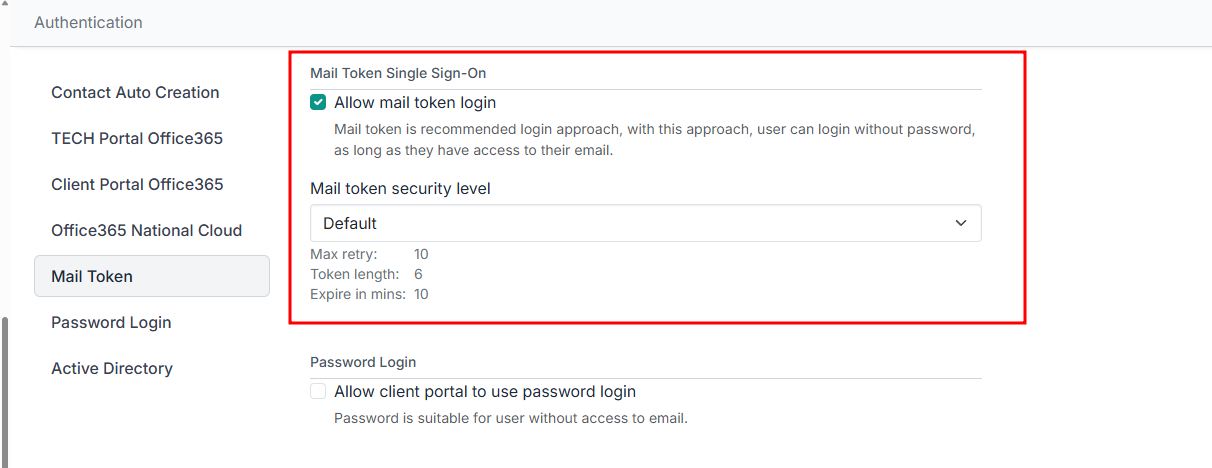
Simply tick the Enable Passwordless box and save your settings. From this screen, you can also change the DeskDirector name, which is referenced in the email to the client. DeskDirector will, however, automatically use the DeskDirector name you have configured at the client in this email.
This is also where you configure the email address the email will be sent from. This could be a valid address or a "no-reply" type address.
Setting an Account's Email Domain
Passwordless supports adding the email domain(s) for that client. This will be used as a method to determine which account the user works for and is critical in ensuring contacts are created under the correct company/account in your PSA, if we cannot find a contact with a matching email address.
- For each of your clients, open their Account in the Admin Portal
- Enter their email domain (e.g.
deskdirector.com) into the Email domain field - Save.
You can add multiple domains for a company if required.
Logging in via an email token
Users will be given a dialog to enter their email, where they will receive their login token:
- User enters their email address
- Select Sign in using email token.
- An email will be sent to that email address with a temporary token. They can either click Login Now from the email or copy the token and paste it into the login dialog. The token only lasts 10 minutes, so make sure they need to complete this step quickly to ensure there are no issues.
- Optionally, if the token never arrives or expires, they can click Resend token
Once this is completed, the user will be logged in.
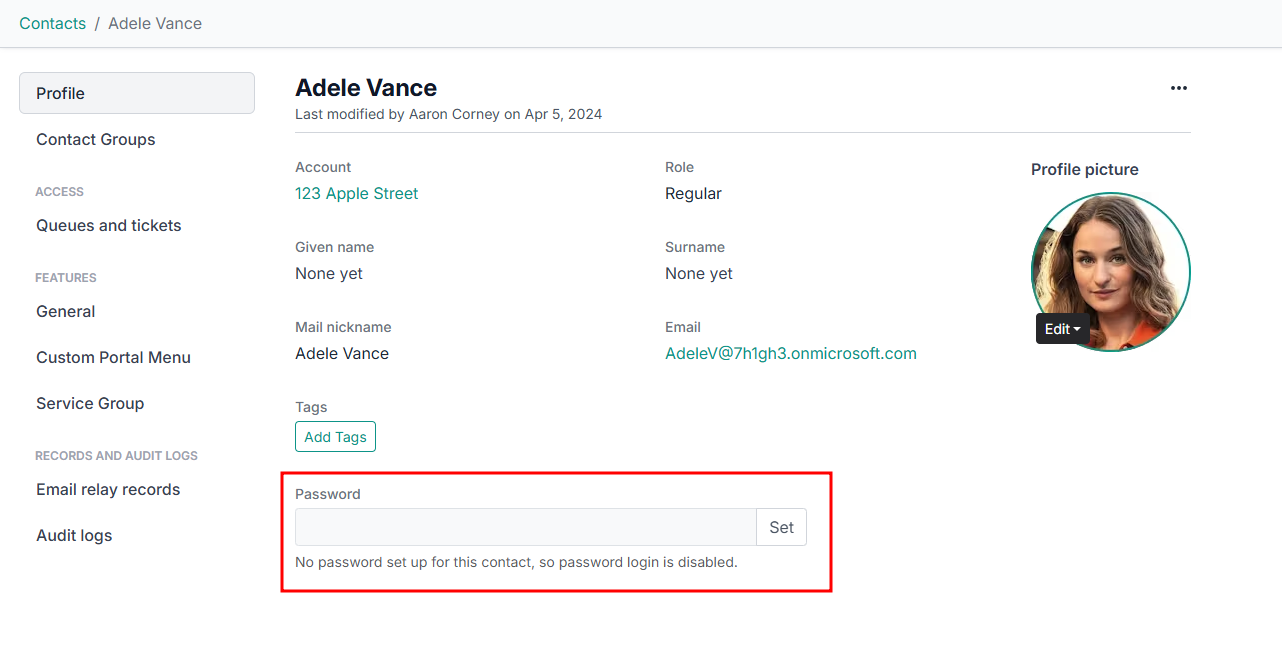
Log in via Password
To set a password for a contact, navigate to the Admin portal and head to Portal > Contacts. From here, simply search for the contact whose password you wish to add or reset. Once in the Profile page for the specific contact, scroll down to the Password section. Here you can enter a password and click Set.
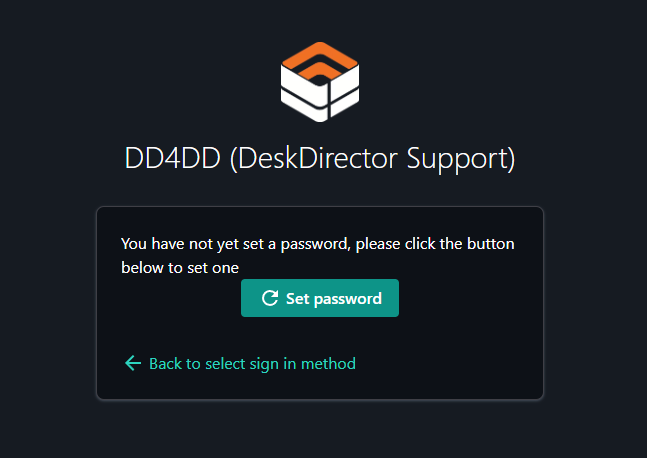
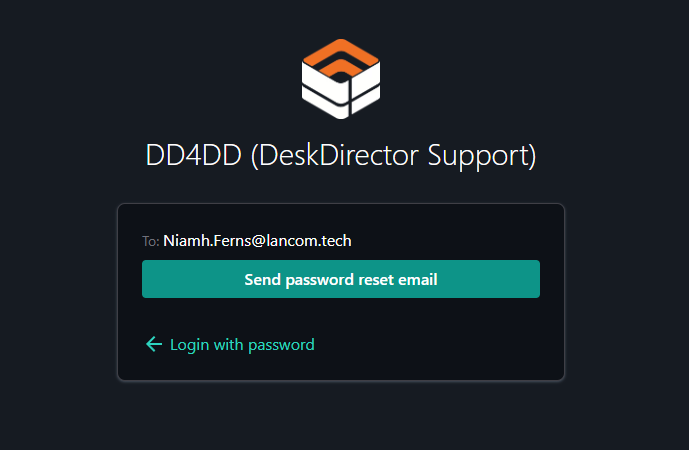
Alternatively, users can also initiate a password reset from the DeskDirector Portal login screen themself. All they need to do is initiate a login and select sign-in with a password. They should be greeted by a login screen where they can enter their password.
Click Set password when prompted
They will then be prompted to send a password reset email:
After setting/resetting the password, the user can now try logging in with their username and password.
Password Requirements
DeskDirector uses zxcvbn, created by Dropbox, to enforce password strength. In short, we calculate how fast it is to brute force your password and give it a score based on that. The longer it takes to brute force, the better. This will be shown in 5 levels:
- 0: Very weak
- 1: Weak
- 2: So-so
- 3: Good
- 4: Great
We currently accept passwords level 2 or above.
Saved Passwords
Passwords are not saved in plain text. This means if our database were ever to be compromised, the stored, salted password hashes would still be useless to an attacker. You can read from Salted Password Hashing - Doing it Right. This helps in particular with rainbow table attacks.
The salt that is added to the password hash helps protect from a rainbow attack. Where attackers cannot use a list of commonly used passwords to guess the value of a hashed value.
Frequently Asked Questions
OAuth Related Questions
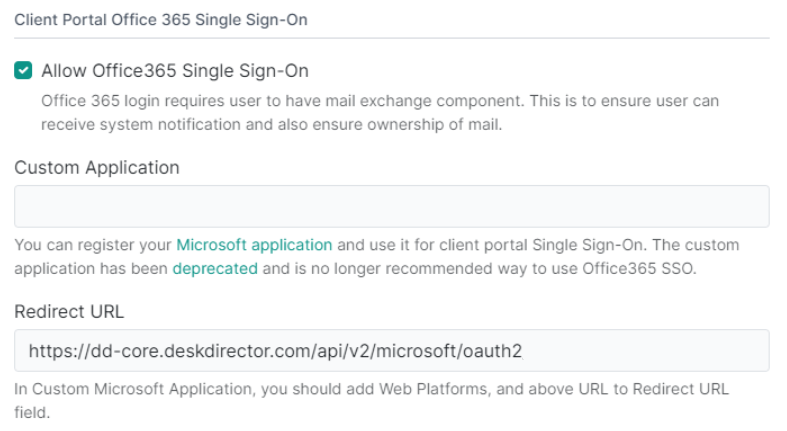
"Am I already using the new OAuth?"
Open your Admin portal and head to System > Authentication > Client Portal Office 365 Single Sign-On. When using a custom application, you will see the Custom Application and Redirect URL input fields filled. If these are empty, you are using new OAuth.
New OAuth:
Center
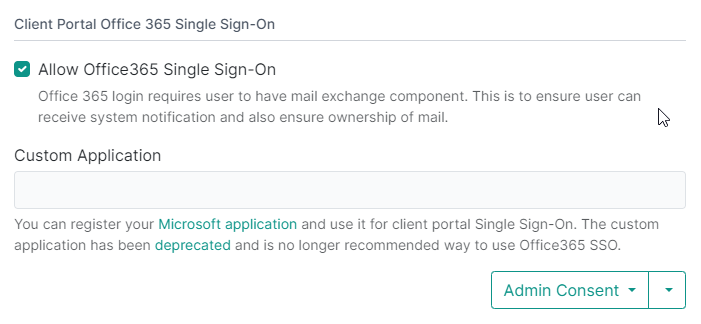
Old OAuth (via Custom Application):
"How do I switch to new OAuth?"
- Log in to your Desk Director Admin Portal and head to
System>Authentication>Client Portal Office365Tab. - Select Delete Custom Application from the drop-down arrow.
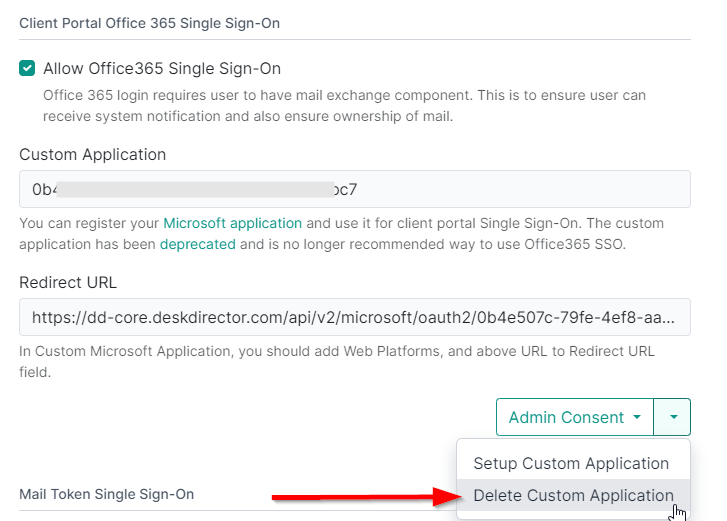
- Make sure the custom application text box is blank and Allow Office365 Single Sign-On is ticked.

- Press Save
"Why did DeskDirector deprecate custom application OAuth?"
SSO via custom applications was never a legitimate way to perform OAuth. The application should be owned by the software service provider, not by the customer. From a legal point of view, the responsibility of reading user profile data should be taken by DeskDirector. From a usability point of view, we also came to a point where it wasn't feasible to maintain. As we expand our offerings, there are many settings we have to adjust, and this has caused significant growing pains. We also found secret maintenance to be a major concern for our clients.
"What is the issue with secret maintenance?"
Application secrets should be short-lived; thus, Microsoft has been limiting secret lifetimes to a maximum of 2 years. They also introduced an asymmetric key to replace secrets. As we keep improving the security, we will eventually move to using asymmetric keys rather than secrets. As such, maintenance costs for both DeskDirector and our customers were too high.
"Will DeskDirector remove Custom Application anytime soon?"
We don't have any specific date at this stage. The feature has been deprecated since the 15th of Jun 2023. We do not provide any support for old OAuth at this stage, however, and will only assist in moving to new OAuth.
"Do we need to adjust anything for this deprecation?"
No, everything should be working as intended. Even if we remove the custom application, we will be based on the existing setup to auto-enable default SSO. The only impact will be that the end user might encounter consent to view their profile.
"How do we minimise the impact of migrating to new OAuth?"
You can perform admin consent to grant DeskDirector read user profile access for a specific tenant. You can perform that under the company profile page or the authentication page. Admin consent will not grant DeskDirector access to list users in the tenant. It only allows auto-approve consent when a specific user of that tenant requests it.
"What scopes will DeskDirector ask for during admin consent?"
User.Read, openid, email and profile. You can check what to expect in Microsoft's documentation. During authentication, our application will only ask to read the user's profile with User.Read, where openid, email and profile are for the desktop application to authenticate users. It uses OAuth openid to read a user's profile to find things like their primary email.