Table of Contents
Desktop Portal
 Updated
by Niamh Ferns
Updated
by Niamh Ferns
Desktop vs Web Portal
The installed DeskDirector application and the DeskDirector web app have much of the same functionality, but there are a few differences that you should be aware of when considering what you want your clients to use.
"Which version should I use?"
If you want your users to be able to automatically log in or have their computer details added to internal notes when a ticket is submitted, you may want to roll out the desktop application. However, the web version should be considered if your clients are not on a domain or are outside of work.
Installation Guide
Via the Installer Package
- Download and install evergreen standalone WebView2 (for all users)
- Download and install .NET 8.
- Download the Desktop Portal package from Admin Portal. You can find this under
Client Portal>Desktop Installer.Do not download MSI. The MSI is available for people who are familiar with advanced installer concepts and for troubleshooting. It is not used for deployment of the Desktop Portal. - Unzip and open the package that you downloaded. You should see:
appsettings.jsonfor individual customisation of installation. (This is where you can change the name of the installed application if desired.)client_desktop_app.msithe Windows Installer Package for the Desktop Portalfavicon.pngfrom your portal's Default Branding in the Admin Consolelogo.pngfrom your portal's Default Branding in the Admin Console
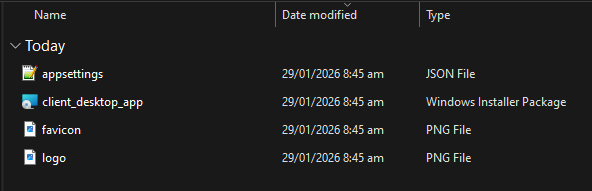
- Run the MSI as an administrator, and follow the onscreen installation wizard
Custom Installations
For version 5 and up, you can modify the portal name, favicon and logo as you wish. The package installer is to provide a shortcut and simplify the installation process. You can change favicon and logo files, as long as they are proper PNG format.
Changing the file extension for other image types .png will not allow you to use that image. You need to use an image converter to make sure your image is correctly formatted as a .png.
{
    "Homepage": "https://your-domain.deskdirector.com",
    "PortalName": "Support portal",
    "CompanyName": "DeskDirector",
    "TechPortalMode": false
}- Homepage: We recommend using your DeskDirector subdomain, since it will remain with the server as long as you are with us. If you use a custom domain, the desktop application will need to be redeployed every time the domain changes.
- PortalName: The shortcut name or application name that appears in the installed apps section.
- CompanyName: The start menu folder name.
- TechPortalMode: This should always be false. The flag allows the tab system in the application and also includes TECH-specific features, such as which menu item will be added to the system tray.
You can change the above settings or images before or after installation. If you customised any of them after installation, you can use the MSI installer again as a repair option.
Deployment via PowerShell & RMM
Prerequisites
For the PowerShell script to work, it requires a remote location for these files:
- client_desktop_app.msi
- appsettings.json
- favicon.png
- logo.png
Steps
C:\Temp\DeskDirector. This helps RMM software to install the Desktop Portal automatically as long as these files are present.- Download your MSI, appsettings.json, and the logo and favicon files to
C:\Temp\DeskDirector - Have your RMM use
msiexec.exeto execute on the installer
Example Script
$ErrorActionPreference = "Stop"
$ProgressPreference = "SilentlyContinue"

# --- 1) Set your URLs here ---
$Urls = @{
    WebView2     = "https://go.microsoft.com/fwlink/?linkid=2124701"
    DotNet       = "https://aka.ms/dotnet/8.0/windowsdesktop-runtime-win-x64.exe"
    DesktopMsi   = "<PASTE_DESKTOP_PORTAL_MSI_URL_HERE>"
    FaviconPng   = "<PASTE_FAVICON_URL_HERE>"
    LogoPng      = "<PASTE_LOGO_URL_HERE>"
    AppSettings  = "<PASTE_APPSETTINGS_URL_HERE>"
}

# --- 2) Where to download files ---
$DownloadDir = $PSScriptRoot
New-Item -ItemType Directory -Path $DownloadDir -Force | Out-Null

# --- 3) Files to download (URL -> local filename) ---
$Files = @(
    @{ Name="WebView2";    Uri=$Urls.WebView2;    Out=Join-Path $DownloadDir "webview2.exe" },
    @{ Name=".NET";        Uri=$Urls.DotNet;      Out=Join-Path $DownloadDir "windowsdesktop-runtime.exe" },
    @{ Name="Desktop MSI"; Uri=$Urls.DesktopMsi;  Out=Join-Path $DownloadDir "client_desktop_app.msi" },
    @{ Name="favicon";     Uri=$Urls.FaviconPng;  Out=Join-Path $DownloadDir "favicon.png" },
    @{ Name="logo";        Uri=$Urls.LogoPng;     Out=Join-Path $DownloadDir "logo.png" },
    @{ Name="appsettings"; Uri=$Urls.AppSettings; Out=Join-Path $DownloadDir "appsettings.json" }
)

function Download-File {
    param([string]$Name,[string]$Uri,[string]$OutFile)

    Write-Host "Downloading $Name..."
    Invoke-WebRequest -Uri $Uri -OutFile $OutFile -UseBasicParsing

    if (-not (Test-Path $OutFile) -or (Get-Item $OutFile).Length -le 0) {
        throw "Download failed or file is empty: $OutFile"
    }
}

# --- 4) Download everything ---
foreach ($f in $Files) {
    Download-File -Name $f.Name -Uri $f.Uri -OutFile $f.Out
}

# --- 5) Install prerequisites and app ---
Write-Host "Installing WebView2..."
Start-Process -FilePath (Join-Path $DownloadDir "webview2.exe") -ArgumentList "/silent /install" -Wait

Write-Host "Installing .NET Windows Desktop Runtime..."
Start-Process -FilePath (Join-Path $DownloadDir "windowsdesktop-runtime.exe") -ArgumentList "/install /quiet /norestart" -Wait

Write-Host "Installing Desktop Portal..."
$msiPath = Join-Path $DownloadDir "client_desktop_app.msi"
Start-Process -FilePath "msiexec.exe" -ArgumentList "/i `"$msiPath`" /qn /norestart" -Wait

Write-Host "Setup complete."
Deployment for MacOS & Linux
DeskDirector v5.0.0+ is not currently supported natively on macOS and Linux. You can, however, still give users an experience similar to the Desktop app via Chrome using the Install as application option for the Web client.
To do this:
- On the user's machine, open Chrome and navigate to your Client Portal
- Click on the hamburger menu on the top right
- Click Cast, save, and share
- Click on Install page as app
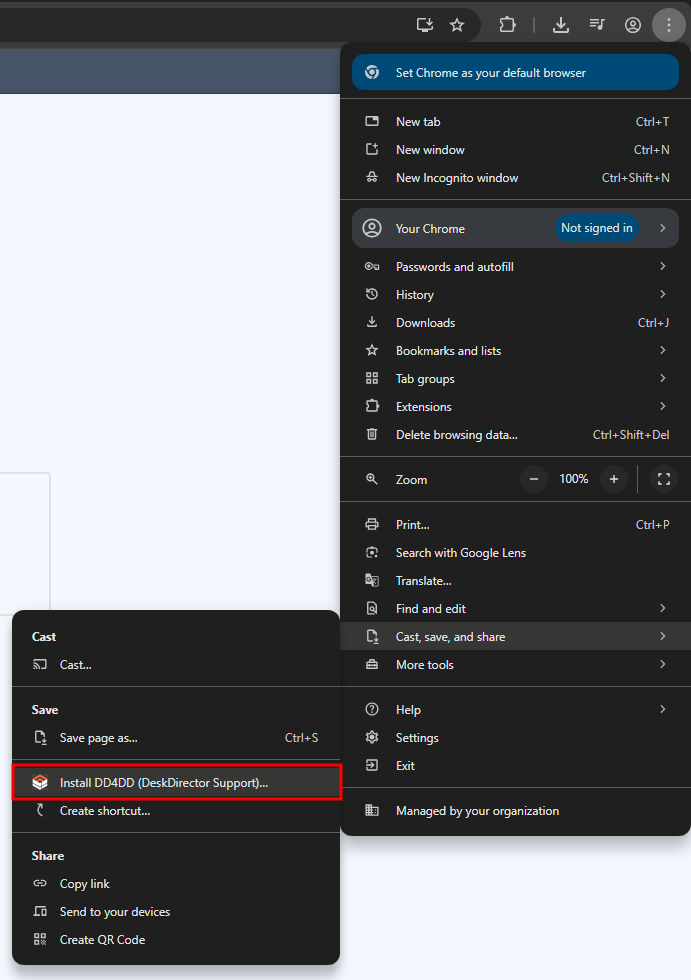 Note: this may be labelled with the name of your portal, as in the screenshot above
For some Linux distributions, you may also need to create an application entry under $HOME/.local/share/applications or /usr/share/applications for it to appear in the user's application menu.
Troubleshooting
For more on troubleshooting the DeskDirector Desktop Portal, see our documentation on common issues.
Frequently Asked Questions
"How to disable app auto-start?"
To disable app auto-start, set the ENABLEAUTOSTART parameter to 0 (zero). Usage example: msiexec /i "ddtech.msi" /L*V "install.log" ENABLEAUTOSTART=0.
You can verify that this setting has been applied under the following directory in the users registry:
HKEY_CURRENT_USER\SOFTWARE\Microsoft\Windows\CurrentVersion\Run

Or in the local machine registry:
HKEY_LOCAL_MACHINE\SOFTWARE\Microsoft\Windows\CurrentVersion\Run
"How do I roll out the desktop portal to multiple machines?"
You can deploy the Desktop Portal in three steps. Splitting the rollout like this makes it easier to manage and troubleshoot across many devices.
- Install Microsoft Edge WebView2 (Evergreen Runtime)
- WebView2 is a shared component on Windows that can be used by multiple apps once installed.
- Unlike some desktop apps that include their own browser engine, WebView2 is installed separately and then used by the Desktop Portal.
Note: This is why the Desktop Portal installer does not include WebView2.
- Install the .NET Windows Desktop Runtime
- The Desktop Portal requires the .NET Windows Desktop Runtime to run.
- Deploy it to all devices as part of your standard application prerequisites.
- Install the Desktop Portal
- Deploy the Desktop Portal itself after WebView2 and .NET are in place.
- This is typically done using a deployment script that:
- downloads the installer package to the device, then
- runs the included MSI silently.
For examples of automating these steps with PowerShell and deployment tools, refer to the automation guidance in the sections above.
Can .NET and/or WebView2 be packaged with the Desktop Portal installer?
Not at this stage. WebView2 and the .NET Windows Desktop Runtime must be installed on the device before the Desktop Portal can be installed successfully, and we don’t currently plan to bundle them into the Desktop Portal installer.