Table of Contents

Managing Surveys

Niamh Ferns Updated by Niamh Ferns

This document has been merged into a larger document fully covering surveys within DeskDirector.

See our
Surveys document for more!

Surveys Overview

So you can better check-in on the quality of your service directly with customers, DeskDirector provides a simple built-in survey feature that can either be integrated into the ticket life cycle, used to gauge customer's overall satisfaction with the service interaction once a ticket is closed, or can be initiated via an email broadcast. Survey's come in two main flavors.

Ticket Surveys

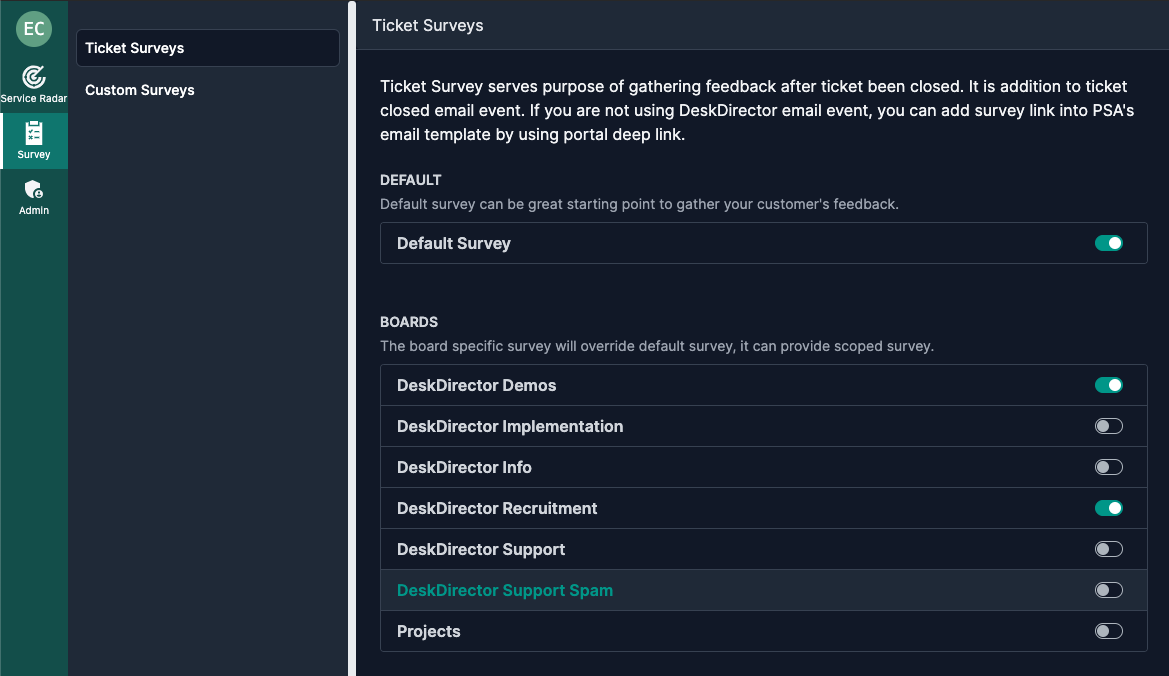
Ticket surveys are used for gathering customers' feedback after a ticket is closed. This works on top of the ticket closed email event and can be accessed this via the Admin portal under Survey > Ticket Surveys.

If you are not using DeskDirector's email events, the survey link can be added into your PSA's email template via a portal deep link.

Default Survey

This is the global control that enables/disables ticket surveys. If this is enabled, ticket surveys are enabled for all the boards in your DeskDirector instance. By default, you will be presented with this page when visiting the default survey. Changes to the question will not be saved unless the default survey is enabled.

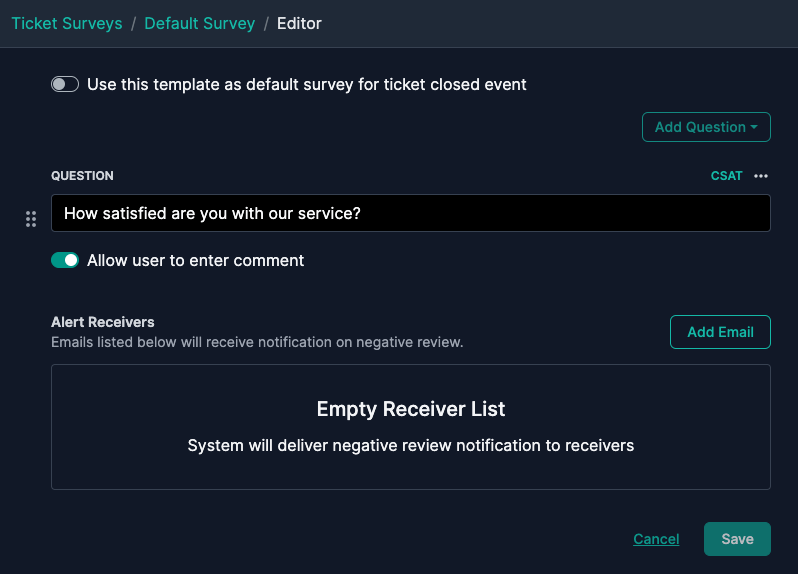
The "Alert Receivers" section will let you specify email addresses that receive a notification once a negative review is created. Both the question and the receivers can be updated at any time.

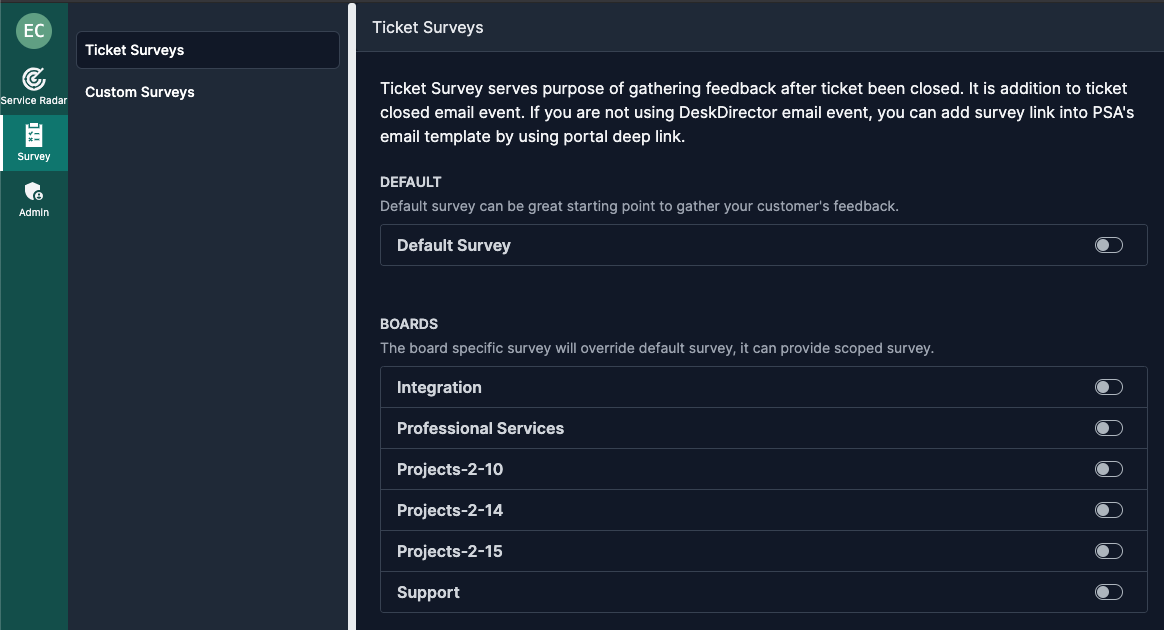
Queue/Board-specific Surveys

The board-specific survey settings will override the default survey settings. This means that you can use different survey questions on each board/queue or set a different alert receiver for each board/queue.

Custom Surveys

While ticket surveys can be tied to the ticket close event, customer surveys on the other hand can be added into an email broadcast. While ticket surveys can only have 1 question, custom surveys can have a maximum of 5, allowing for a combination of CSAT and NPS questions.

Once the custom survey is created, it can be tied into an email broadcast by setting it as the broadcast's custom email template

Creating Surveys

Both survey types follow the same steps to create and only differ on the number of questions that can be added per survey.

Ticket Surveys are limited to only 1 question, while Custom Surveys can have up to 5 questions. Ticket Surveys and Custom Surveys can be easily created/survey from the Survey tab in the admin portal. Technicians with the correct permissions can also update surveys from the Tech Portal.

By default, there is an existing survey CSAT question that applies to the default survey and to the boards/queue-specific surveys. You can keep the question as is, or you can update it to whatever question you want to ask your customers.

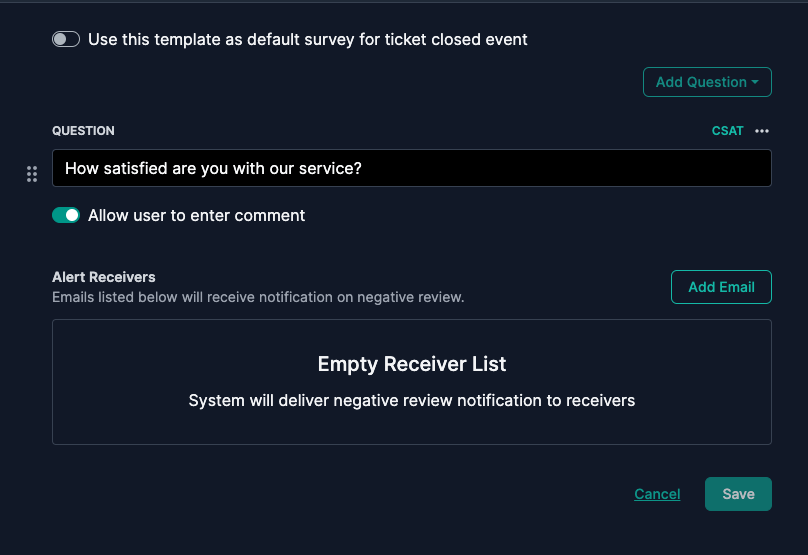
The "Alert Receivers" section is where you can specify email addresses that will receive a notification once a negative review is created. Both the question and the receivers can be updated any time.

IMPORTANT: Deleting an existing survey question will also delete all its current and past results. Please export and backup the survey existing survey results before deleting a questions you will not be able to restore the survey results easily.

Integrating Survey's into Email Templates

The default DeskDirector system email template already contains logic to display a survey button to the email sent when a ticket is closed (this is assuming ticket survey is activated for the board). This means that if you are using the system email template on your board's ticket closed notification event, no change is needed from your end.

"How do we know if we are using the system template for the ticket closed event of a board?"

You can easily identify this from the admin console, via Email > Notification Events > Ticket Board Events then select the board you want to check and look for the Ticket Closed section. An event using the system email template will look like this:

An event using a custom email template will look like this:

For Ticket Closed events that use a custom template, surveys must be manually integrated into your template code.

"How do we integrate surveys into our custom email templates?"

DeskDirector email template utilizes both MJML markup language and the Liquid template engine to allow users to easily program in dynamic email content. This also makes it easy to integrate surveys into your custom email templates.

To get started, you can read these articles to give you an idea of how our templates work:

The logic for the ticket surveys can called via the Survey tag. e.g.

<mj-raw>
{% if Survey %}
</mj-raw>
<mj-text font-size="14px" line-height="1.5">
Your feedback helps us improve the process where needed, and recognize those doing a great job. I know you are busy but, if you can, please take a moment and fill out this survey for us:
</mj-text>
<mj-raw>
{% endif %}
</mj-raw>

This code snippet will check if Surveys are enabled for the board where this email template is assigned to. If yes, it will display the block of text. Here's a sample code snippet adding a "Take the Survey" button into the email template:

<mj-raw>
{% if Survey %}
</mj-raw>
<mj-column>
<mj-button font-family="Helvetica" background-color="#2e86ab" color="white" font-size="16px" font-weight="bold" href="{{ Survey.Link }}" target="_blank">
Take the Survey
</mj-button>
</mj-column>
<mj-raw>
{% endif %}
</mj-raw>

"What if I am not using the Ticket Closed event but want to use a Ticket Survey?"

If you are not using DeskDirector email events, the survey link can be added into your PSA's email template via a portal deep link.

Survey deeplinking can be referenced via &action=survey appended to a deeplink for a related ticket.

Ticket Survey Deeplink Example
https://[your-hostname].deskdirector.com/portal/deeplink?name=ticket&ticket_id=1713798&action=survey

Frequently asked questions:

"I checked 'Surveys' tab in the admin console but I can't see my surveys. Why?"

Surveys are only available for customers on Legacy and Dynamic Plans.

  • "Can I have more than 1 survey question on a ticket survey?"Only one question is allowed per ticket survey on every board. If you want to send out surveys with multiple questions, use "Custom Surveys".
  • "Can I enable ticket surveys on a specific board(s), and disabled on others?"Yes! Just disable "Default Survey" and that will disable surveys for every boards/queues under your instance. Then, just enable surveys for the specific boards you want it activated on.

Tutorials

Creating a Default Survey

20 STEPS

1. Open DeskDirector Admin Portal and click the Survey icon.

Step 1 image

2. Default surveys are sent for all tickets when they are closed. Click Default Survey to open it.

Step 2 image

3. If there are any surveys already submitted by users, you can view them here.

Step 3 image

4. To change the period for survey results, click the drop-down toggle control.

Step 4 image

5. Select the time frame for which you wish to view the survey results.

Step 5 image

6. You can see the survey results in this grid.

Step 6 image

7. To export the survey results, click on the three-dot menu.

Step 7 image

8. You can export as Power B.I or Excel files. Click Export for Excel.

Step 8 image

9. The exported Excel file contains the data from the surveys.

Step 9 image

10. To modify the default survey, turn on the toggle switch.

Step 10 image

11. To activate the default survey, turn on the first toggle switch.

Step 11 image

12. A default first question is provided for you. To add more questions, click Add Question.

Step 12 image

13. You can add two types of questions - CSAT (Customer Satisfaction) or NPS (Net Promoter Score). Click Add CSAT question.

Step 13 image

14. Type the Question you want to add.

Step 14 image

15. To allow or disallow the user to add comments, click the comment toggle switch.

Step 15 image

16. You can add email accounts to receive notifications when a negative review is submitted. To do this, click Add Email.

Step 16 image

17. Type the email address.

Step 17 image

18. Finally, click Save to save the changes.

Step 18 image

19. Go back to the default survey to see your changes.

Step 19 image

20. That's it. You're done.

Step 20 image

** Best experienced in Full Screen (click the icon in the top right corner before you begin) **

https://www.iorad.com/player/2336514/Default-surveys

Creating a Custom Survey

31 STEPS

1. Open DeskDirector Admin Portal and click the Survey icon.

Step 1 image

2. Click Custom Surveys.

Step 2 image

3. Click New to add a new survey.

Step 3 image

4. Type the name for your survey.

Step 4 image

5. To add any tag to this survey, click Add Tag.

Step 5 image

6. Then, select the tag you want to add.

Step 6 image

7. Click Create Survey.

Step 7 image

8. Click the Enable toggle switch to enable this survey.

Step 8 image

9. To add questions, click Add Question.

Step 9 image

10. You can add two types of questions - CSAT (Customer Satisfaction) or NPS (Net Promoter Score). Click Add CSAT question.

Step 10 image

11. Type your question.

Step 11 image

12. To allow or disallow the user to add comments, click the comment toggle switch.

Step 12 image

13. You can add email accounts to receive notifications when a negative review is submitted. To do this, click Add Email.

Step 13 image

14. Type the email address.

Step 14 image

15. Click Save to save the survey.

Step 15 image

16. We can send this survey to users by sending a broadcast message. Click the Tech icon to open the Tech Portal.

Step 16 image

17. Click Broadcasts.

Step 17 image

18. Click Create.

Step 18 image

19. Type the name for your message.

Step 19 image

20. Click Next.

Step 20 image

21. Click Send broadcast email to notify users.

Step 21 image

22. Click the select survey box under the Custom Survey field.

Step 22 image

23. Click the name of the custom survey you created.

Step 23 image

24. Click Next.

Step 24 image

25. Select the publish date. Then, click Next.

Step 25 image

26. You can set users of a specific company to be the recipients of this survey. To do that, click Select.

Step 26 image

27. Select a company.

Step 27 image

28. Click Select.

Step 28 image

29. Click Next.

Step 29 image

30. Finally, click Create to save and broadcast this survey to the users.

Step 30 image

31. That's it. You're done.

Step 31 image

** Best experienced in Full Screen (click the icon in the top right corner before you begin) **

https://www.iorad.com/player/2337422/Custom-surveys

Creating a Request Specific Survey

27 STEPS

1. Open DeskDirector Admin Portal and click the Survey icon.

Step 1 image

2. A queue specific survey can be sent out when a ticket from a specific board is closed. This will override the default survey.

Step 2 image

3. In this example, we will create a survey for tickets from the Incidents Board. Click Incidents.

Step 3 image

4. Click the toggle switch to modify this survey.

Step 4 image

5. Click the toggle switch at the top of the page to use this survey instead of the default.

Step 5 image

6. A default first question is provided for you. To add more questions, click Add Question.

Step 6 image

7. You can add two types of questions - CSAT (Customer Satisfaction) or NPS (Net Promoter Score). Click Add NPS question.

Step 7 image

8. Type your question.

Step 8 image

9. To allow or disallow the user to add comments, click the comment toggle switch.

Step 9 image

10. Status triggers allow surveys to be sent for statuses other than closed. Click the drop-down to see the status options.

Step 10 image

11. Status triggers allow surveys to be sent for statuses other than closed. Click the drop-down to see the status options.

Step 11 image

12. You can select up to 5 statuses. Click Approval Declined.

Step 12 image

13. Click Waiting On Client.

Step 13 image

14. Click anywhere outside of the drop-down to confirm.

Step 14 image

15. You can add email accounts to receive notifications when a negative review is submitted. To do this, click Add Email.

Step 15 image

16. Type the email address.

Step 16 image

17. Finally, click Save to save the changes.

Step 17 image

18. To view and/or export survey results, go back to the queue/board list again and click on your preference.

Step 18 image

19. If any surveys have been submitted, you can view their results here. Click the time drop-down to filter the period.

Step 19 image

20. Click Current Month to view the results of surveys submitted in the current month.

Step 20 image

21. You will find submitted surveys at the bottom of the page. Click any to view the details.

Step 21 image

22. The details are displayed on the screen, as shown here.

Step 22 image

23. Click the back arrow to go back.

Step 23 image

24. To see export options, click the three-dots menu.

Step 24 image

25. Click Export for Excel.

Step 25 image

26. The exported Excel file contains the data from the surveys.

Step 26 image

27. That's it. You're done.

Step 27 image

** Best experienced in Full Screen (click the icon in the top right corner before you begin) **

https://www.iorad.com/player/2337370/Request-specific-surveys

How did we do?

Contact