Table of Contents
Menu Items
 Updated
by Niamh Ferns
Updated
by Niamh Ferns
Menu Items
Menu Items are used to describe content that can then be placed into a Menu. They are created and exist independently of the menus that use them. Modifying an existing menu item will affect all menus that reference it.
You can search, modify, create, and delete menu items from the Menu Items page inside your Admin Portal. You will be able to customise the name and icon of menu items, but be aware that horizontal space inside the Portal Menu is limited. Therefore, names that are too long will be truncated with ellipses. You can also add searchable metadata to the items, known as tags. These are here to help you manage and organise your items.
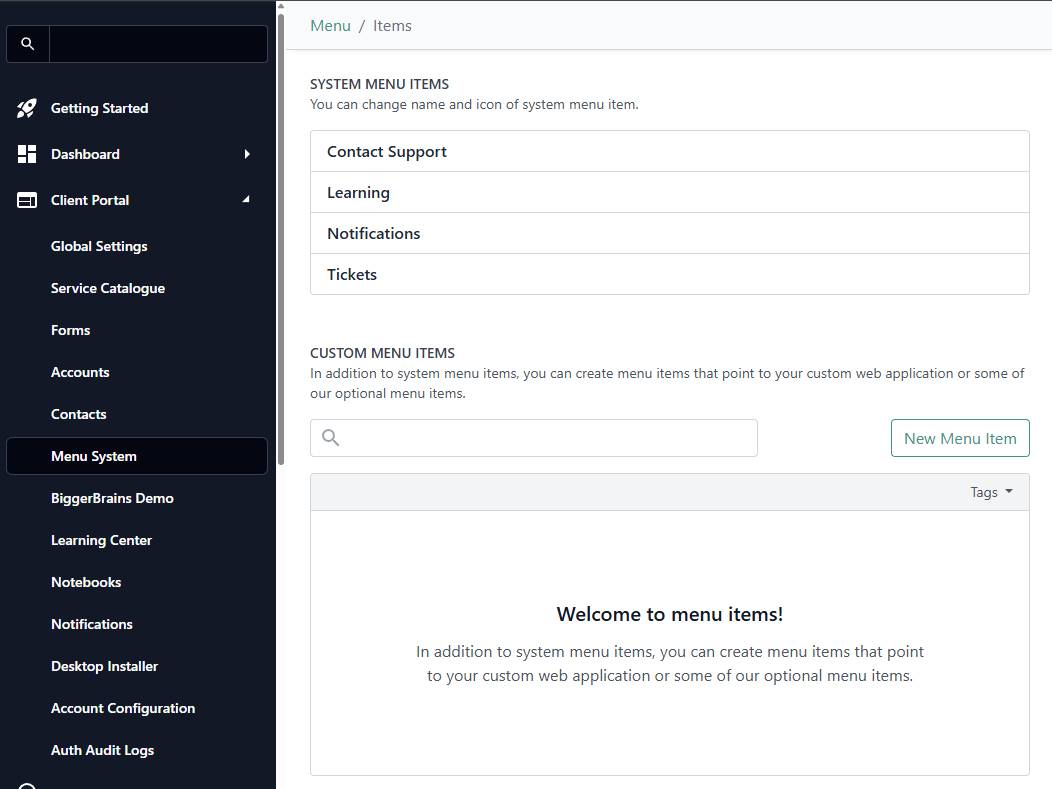
System Menu Items
These are the standard menu items that come with DeskDirector. System menu items cannot be created or deleted, but you can customise their name and icon. These menu items are included in every menu by default.
- Contact Support - This menu item will show the contact the option to either create a ticket or chat with a technician (if the user has Chat permissions enabled).
- Invoices - This will display the Invoices table. (This is only visible if a user has the invoices permission granted.)
- Learning - Represents the learning center. Once the new menu system has been enabled, top-level learning items will instead appear inside the learning center. This is only visible if the learning center permission is granted for the contact/account.
- Notifications - This will display the notification center. This is only available if notifications are enabled.
- Quotes - With this enabled, the quotes table will be displayed to the contact. This menu item is only available if Quotes permission is set for the contact.
- Tickets - This menu item will show tickets that contacts have access to. By default, it will show tickets he owns (open and closed). If the All Tickets permission is granted, they will see the option for all tickets. Similarly, if a user is an approver, they will see the approvals tab as well.
I.E, a user will not see the Quotes menu item if they don't have the Quotes permission. A user will not see the Ticket Approval sub-menu if they do not have the Approval permission.
Creating Menu Items
Creating menu items can be easily done via Portal > Menu Items > New Menu Item:
In the Create Menu Item page, you will be welcomed by options to configure your menu item's name, description, tags, and a set of fields to configure the security and specifics for what the menu item will present to end users.
Please specify the display name of the menu item, then specify an icon to be used for it. You should be presented with a few options upon selecting the icon form.
Type of Menu Items
After specifying the menu name and icon, you should now choose the type of menu item you want to set up.
Extension Menu
This menu item will allow you to embed a website into the portal. You just need to specify the extension site's URL. This powerful menu item provides a clean way to resolve many edge cases or situations where a feature isn't natively available in DeskDirector, and adds a lot of flexibility and functionality to the Client Portal.
ConnectBooster Menu
This menu item will embed ConnectBooster (invoices and payments) inside the portal. You just need to specify the ConnectBooster site URL.
OneNote Notebook Menu
This menu item will embed a OneNote Notebook into the portal. You should be able to choose from a selection of existing OneNote Notebooks. If you have not created one yet, you can easily create OneNote Notebooks from the DeskDirector Portal.
BiggerBrains
The BiggerBrains menu item will allow your customers to view all the BiggerBrains courses for the given product. You can select which BiggerBrains product you want to show in the menu item.
Learn more about BiggerBrains
Extension Menu Items
Sandbox Restrictions
When creating a new menu item and selecting Extension Menu, you should see an overwhelming number of checkboxes that refer to the extension menu item's security and query parameters.
Upon adding an external site as your extension menu, it will be fully sandboxed by default for security.
What is a sandbox?
Sandboxing applies extra restrictions to the content in the frame that you are embedding in your DeskDirector portal. You can read more about sandbox in iframes in this document from MDN web docs.
In simpler terms, a sandbox is meant to protect your DeskDirector users from triggering something from the external site you embedded that will compromise their experience. In DeskDirector, sandbox restrictions can be easily lifted at your discretion.
Lifting Restrictions via Security Templates
To save you the headache of having to research what each sandbox option does, you can easily lift the sandbox restrictions by using security templates.
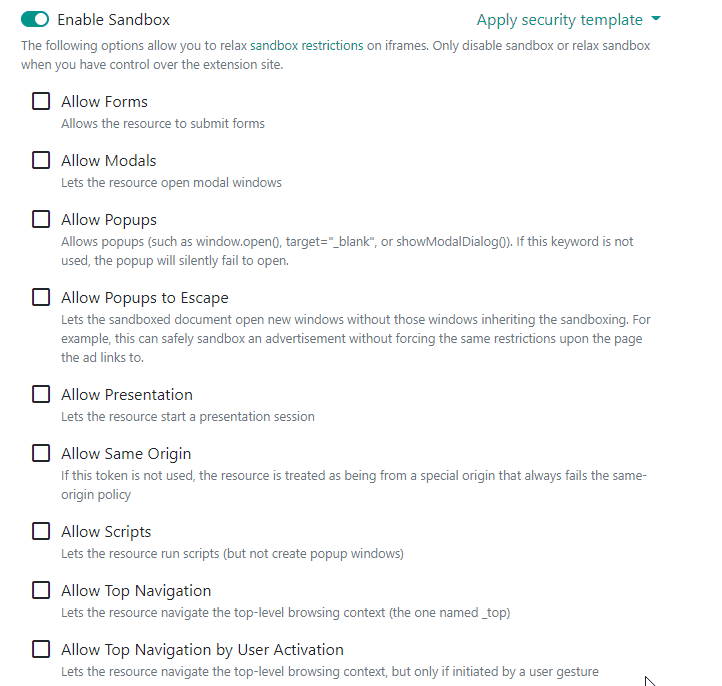
- I own the site, I know what I'm doing: This template will basically lift all restrictions - no holds barred. This means you trust everything that this site will do when embedded into your portal.
- I know this site, I trust it: This template will turn off most restrictions, aside from allowing top navigation and allowing top navigation by user activation. If you want these enabled/available, then you can always tick them, or just select the first template.
- I found this site, avoid exploits: This template disables both restrictions from above, plus allows pop-ups to escape. This means that pop-ups can't open new windows.
- I don't trust this site: This basically is the opposite of the first template. All restrictions are in place for this option
Extension Menu Item Query Parameters
Query parameters allow the portal to also pass through certain information inside the query parameters that can be reused by the embedded site. This can be very useful for different scenarios, as this adds capability for more personalisation to the content on the embedded site.
Example use case of query parameters:
- Use the parameter "Contact Name" to say a simple greeting in the embedded webpage
- Use the Contact Email parameter to check if the email address has been compromised (see https://haveibeenpwned.com/)
- Use the Company Name parameter and have the embedded page open a feed/stream of news that relates to the company.
The possibilities are endless in using the query parameters to present a more personalised experience for your users.
Dynamic Content for Logged-in Users
Basic Setup
There are scenarios where you want to display customised content for your customer, or you have created an awesome internal website that you want to share inside the DeskDirector Portal, but you only want users who have logged in to have access to it and not publicly open to the internet. Below, you can see an example of how this can be achieved with menu items
This will make use of:
- Dynamic Menus (This is the core feature we're interested in here.)
- Access Tokens
- iFrame Sandboxes
- The DeskDirector API
- Create a new Menu Item in the Admin Portal under
Client Portal>Menu System>Menu Items
We will use an extension menu item for this case. You should enter the following fields.- Name
- Icon
- Website URL
- Select Access Token inside Query parameters
- Enable Access Token

- Create or open your preferred Menu Group under
Client Portal>Menu System>Menu Groups. (This can either be under a new menu or under the default menu.) - Add the menu item you have just created to this collection.
- Add in handling to consume the access token provided by DeskDirector. (You can see this below.)When our portal accesses an external website, it will pass an access token in the request's headers.The access token can be extracted and used to query the DeskDirector server if needed (see below for an example on using this to query user info).
const accessToken = 'get access token from query params';
You are not restricted to the above API. Pretty much 99% of our Portal API can be authenticated to via this Access Token. With the code above, you can also verify the user. If your website is based on MVC (Model View Controller), then you can verify the user before the web page is returned. If a user is unauthorised or incorrect, you can redirect them to a different page!
// Will return something that looks like this:
// {
// "userName": "test@email.com",
// "entityId": 188
// }
const request = fetch('https://{sub-domain}.deskdirector.com/api/v2/user/client', {
method: 'GET',
headers: {
Authentication: `DdAccessToken ${accessToken}`,
Accept: 'application/json'
}
});
const response = await request;
const result = await response.json();
console.log(result);You can see more API endpoints via your Swagger instance athttps://{sub-domain}.deskdirector.com/swagger.
Read more about the DeskDirector API.
Additional: Access Token Life Cycle
An access token has a limited life span. It is only available for one hour. For backend approaches, you can authorise users every time they access an endpoint.
For frontend approaches, we will introduce a capability for an iframed page to talk to its parent. So, they can ask for another access token when it is close to its expiration.
Additional: iFrame Sandbox
You can read more about sandboxing here. Basically, a system exposes all the relevant options for an iframe sandbox. If the website is constructed by yourself, feel free to disable the sandbox. If not, please choose proper security with sandboxing enabled.
Similarly, you can choose to pass an access token to the external site, but if they use it to retrieve sensitive information about a logged-in user, this is at your own risk.
Example Extension Menu Item
- Unlock the host for your Site. To allow CORS, we need to add the extension site's host to DeskDirector. Navigate
Advanced>Developer Cornerin the Admin Portal and add a host at the bottom of the Developer Corner page: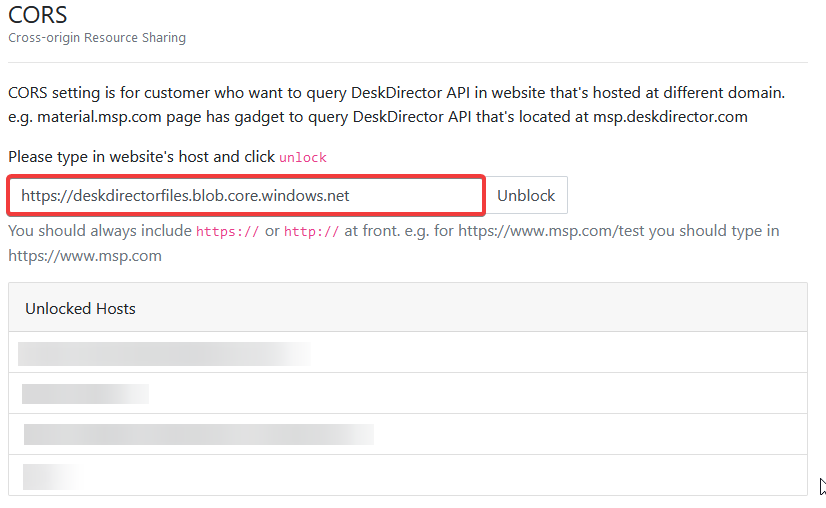
- Under
Client Portal>Menu System>Menu Items, create a menu item for an extension demo page - Set up a New Menu Item:
- Type: Extension Menu
- Extension Site's URL: https://deskdirectorfiles.blob.core.windows.net/media-public/demo/access_token_demo/access_token.html
- Enable Sandbox
- Allow Same Origin
- Allow Scripts
- Under Query Parameters, Enable Access Token
- Navigate to
Client Portal>Menu System>Menu Groupsthen click New Menu. - Add the new Extension Demo Page to a menu group by clicking on the Add Menu Item button
- Save
- Allow tkn test contact to use the newly-created menu group by navigating to
Client Portal>Contactsand selecting your desired contact, then under Custom Portal Menu, select the menu group you created earlier