Getting Started with DeskDirector
DeskDirector Portals
Browser Support
What is the DeskDirector Admin Portal?
What is the DeskDirector TECH Portal?
What is the DeskDirector Client Portal?
Desktop Portal
Managing Your Account
Pricing & Subscription Plans
Deskdirector - Sign up walk through
Managing your DeskDirector Subscription
Admin Essentials
Release Notes
Permissions & Feature Configuration (ConnectWise/Autotask Partners)
Automatic Contact Creation
The Developer Corner
DeskDirector Features Overview
Desktop Portal Version Differences
Logging in to DeskDirector
Managing Tickets with DeskDirector
User Profiles & Profile Pictures
Office Hours
How Searching Works
Embedding Help Page Media
Get started with the DeskDirector Power Automate Connector
Features
Portal Customization
Service Catalogue
Forms
Communication
Actionable Messages for Emails
Real-Time Chats
Notifications
Email Notifications
Email Template Engine
Surveys
Broadcasts
Generative AI
DeskDirector with Generative AI
Setting up AI Service Providers
AI Assistants in DeskDirector
Custom Tools for AI Assistants
Knowledge Bases for AI Assistants
Ticket Summary for TECH Portal
Set up Microsoft Foundry Agent Service with DeskDirector Portals
Advanced
Login & Authentication
Accounts and Companies
Contacts
Contact Groups
Approvals
Task Lists
The Learning Center
Tags
Custom Domains
File Storage
Portal Deep Linking
Service Dashboard
Auditing and Analytics
Integrations
ConnectWise
ConnectWise Custom Menu Item for DeskDirector Tech Portal
ConnectWise
ConnectWise Quotes & Invoices
ConnectBooster
ConnectWise - Avoid Aggressive Notifications
AutoTask
Switching or Merging PSAs
QuoteWerks
Wise-Pay
TimeZest
BiggerBrains
OneNote Notebooks
Integrations - Frequently Asked Questions
IT Glue
Microsoft Teams App
Introducing the DeskDirector for Microsoft Team App
Installing the Microsoft Teams App (Client Mode)
Installing the Microsoft Teams App (TECH Mode)
Setting up Tags for Teams Discussions (TECH Portal)
Branding the DeskDirector Teams App
DeskDirector Teams App Notifications
User Groups Integration with Microsoft Teams
Setting up Content Security Policy (CSP)
Advanced topic: Setting up Tech & Client Mode in the same tenancy
Integrating Microsoft Teams with DeskDirector Tech Portal
Smart Alerts for TECH Users
Microsoft Power Automate
Actions
Solutions
Power Automate Template Gallery
Featured Solution: Teams Ticket Discussion
Featured Solution: Ticket Briefing
Power Automate Administration
Power Automate Connector - Setting up your first flow
DeskDirector Power Platform Connector Reference
Troubleshooting
Troubleshooting via Web Developer Tools
Desktop Portal - Common Issues
Contact & Service Agent Impersonation
Diagnose Entities Tool
DeskDirector Desktop App - Installation Issues
Troubleshooting DeskDirector Connection Issues
Login & Authentication - Common Issues
Permissions & Access - Common Issues
Tickets & Chats - Common Issues
Approvals - Common Issues
Email & Email Delivery - Common Issues
PSA Entity Syncing - Common Issues
PSA Integration - Common Issues
ConnectWise Integration - Common Issues
Autotask Integration - Common Issues
ConnectWise Audit Trail - Exporting API Logs
Microsoft Teams App - Common Issues
Contact DeskDirector Support
Security
Glossary
Archived
Table of Contents
Menus
 Updated
by Niamh Ferns
Menus Overview
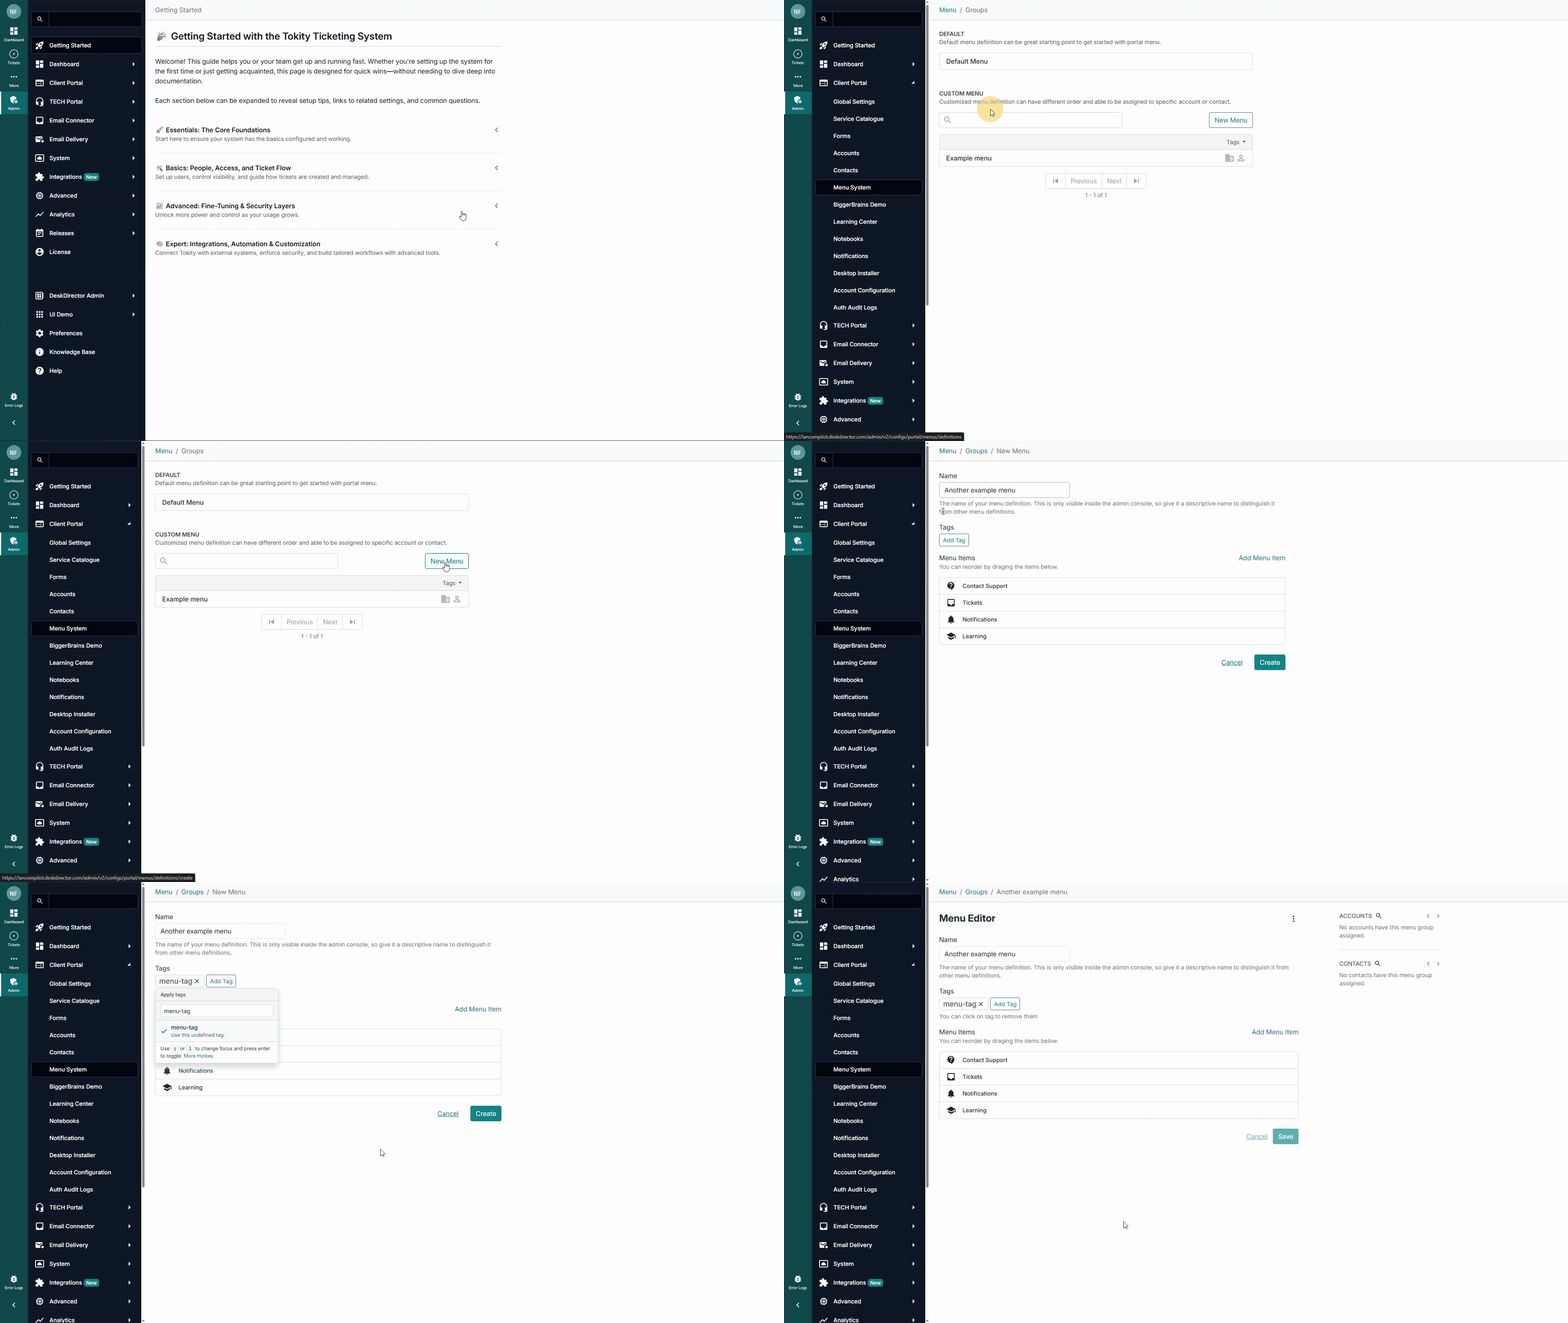
Menus (also called Menu Groups) are used to gather together Menu Items into an ordered list. You can search, modify, create and delete Menus from the Menu Group page inside your Admin Portal. Menus exist independently of the accounts and contacts you will assign them to.

Initially, you will only have the Default Menu already set up. This menu is a global catch-all, which users will see when there isn't another menu assigned to them from an account or contact level.
The Custom Menu section shows a list of the menus that have been created for your DeskDirector instance. Adjacent to each custom menu name are 2 icons, which represent accounts and contacts, and a green highlight indicating if the menu has been assigned to a contact or account.
Assigning menus to a contact can be done from the Accounts and Contacts tabs in the Admin Portal, respectively:
Creating Custom Menus
Every menu group contains a set of system menu items by default, which cannot be removed.

You are able to search through the Menu Items you have already created, adding them to the menu. Using your mouse to click and drag, you can rearrange the menus into an order of your choosing.
Editing Menus
Any of your menus can be edited as you wish by clicking on the menu from the menu group list. The right pane of the menu editor should show the companies and contacts that are assigned to and using the menu.

Portal Landing Page
The first item in any menu will automatically become your Client Portal's landing page.
This will be the first page a user sees when they open the portal, unless you have deep-linked elsewhere in the application. The top menu item will also look slightly different from other menu items in order to differentiate it and give it emphasis.
The top item in the menu should always be the one that is most relevant to the target company or user. For most users, this will be the Create Ticket page, but for some users, it might make more sense to show them the Approvals or Invoices page straight away (for example).
Assigning Menus to Companies and Contacts
The menu system uses a cascading override approach for configuration. The global menu will be overridden by any account-level menu configuration, which in turn will be overridden by any contact-level menu configuration. We recommend that you progressively define more specific menus as you need them. Starting with the global menu, then the menus for specific companies, and finally the menus for specific contacts, as required.
You will need to find the account or contact you wish to configure a menu for in the Accounts or Contacts page. Navigate to the Custom Portal Menu tab, where you will see some information about the currently applied menu. Choose the option to override this and select a Menu from the dropdown, and click Save.

As always, when making configuration changes that affect the Portal, it is a good idea to impersonate a contact to check if things are working as expected.
