Table of Contents
Email Notifications
 Updated
by Niamh Ferns
Updated
by Niamh Ferns
Email Notifications Overview
DeskDirector comes with an email notification and templating system that allows you to customise the look of your email notifications and when they should be triggered. With this comes a few key benefits:
- Better default branded email formats
- Responsive and mobile-friendly emails
- Extensive customisation options
- Utilisation of well-known existing tools: MJML and Liquid. If you have a developer or if you are familiar with both frameworks, you can customise your email template's design better.
- Ticket authors' notes will display correctly for ConnectWise. (GitHub Bug Report)
Email Types
Email Type | Description | Setup | Customizable | Events |
System | For login tokens and reset password events | No special setup required | Yes |
|
Global Ticket | Used for the ticket approval and forms request events | Yes |
| |
Notification Events | For ticket life cycle event. Includes new ticket, closed ticket and note added. | See below on setting up email notification events | Yes |
|
Global Email Notification Settings
The global configuration for email notifications can be accessed via the Admin Portal under Email Delivery > Settings.

- Server host: This value is used inside email templates that reference the DeskDirector URL token. It can be your DeskDirector URL or one of the custom domains added to your instance.
- Email delivery account: This is the default global delivery account that will be used. This can be changed anywhere that you can use any email delivery account you have set up.
- Test receiver's email: Any email address added to this field will be BCC'd on any email our system sends out.
- Allow auto login for the client portal link: For more information regarding auto login. See Login via Magic Token for more.
- Login token expiry time: Update the token's expiry time
- File link expiry time: Allows you to configure file expiry tickets for links to files in DeskDirector's file storage.
- Adaptive card provider: Used for actionable messages.
Mail Delivery History
Delivery History is a great troubleshooting tool for whittling down the cause of undelivered emails from your defined mail host. You will be able to access the email history under Email > Delivery History

Notification Events
DeskDirector notification events make it easy to assign email templates to specific events in your DeskDirector instance. There are 3 types of Notification Events in DeskDirector, each of which has different events that can be assigned with a specific email template. You can see these in the table above.
Setting a Template
Assigning a custom email template to a specific notification event allows you to define what the email looks like when that event occurs via our email templates engine.
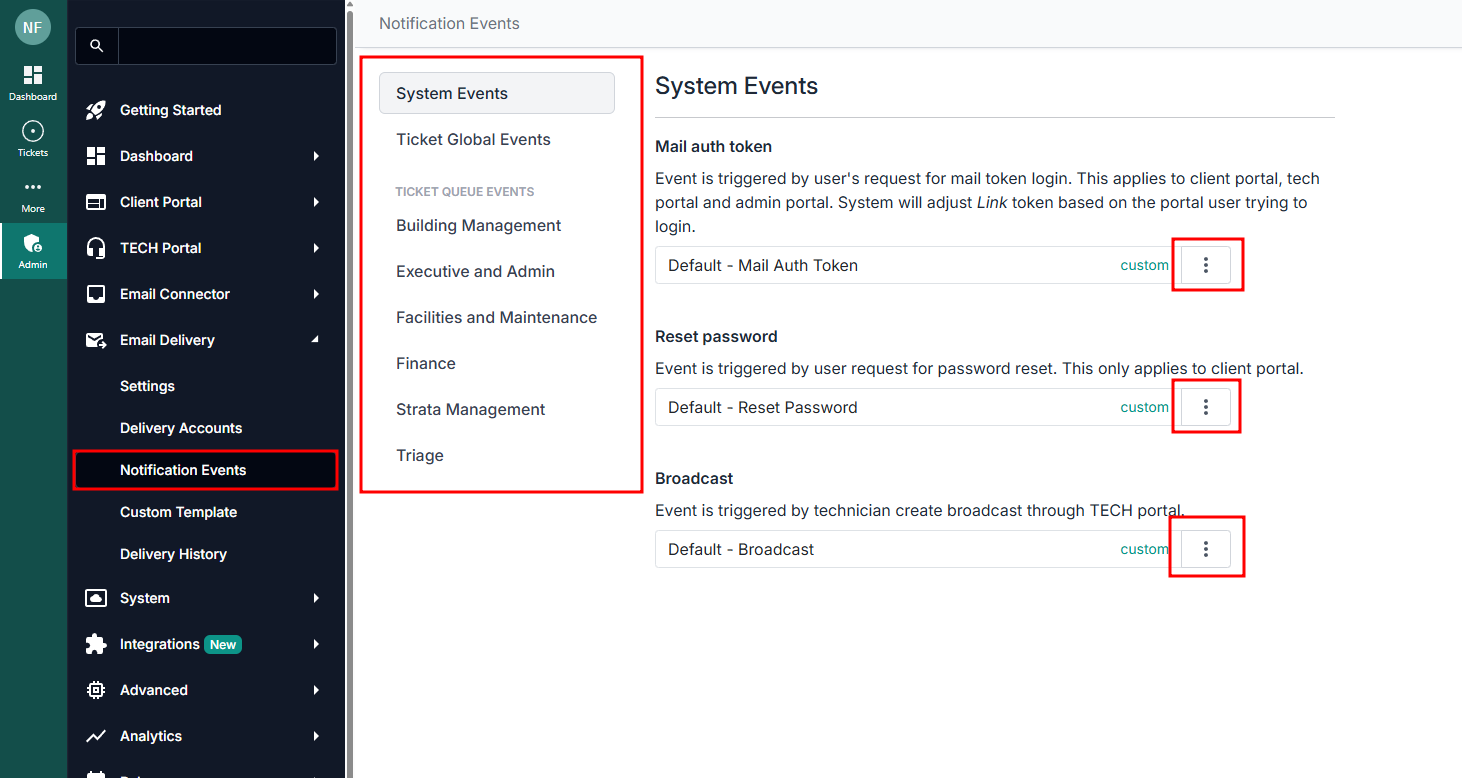
- Log in to your Admin Portal and head to
Email Delivery>Notification Events - Select the event you want to assign a template to
- Look for the specific event and click Change
- Select the custom email template from the pop-up.
Custom Templates
Here is where you can see a list of email templates that your DeskDirector instance can use. You can update an existing template or create a new one. Here are two detailed guides on the email template engine.
Delivery Accounts
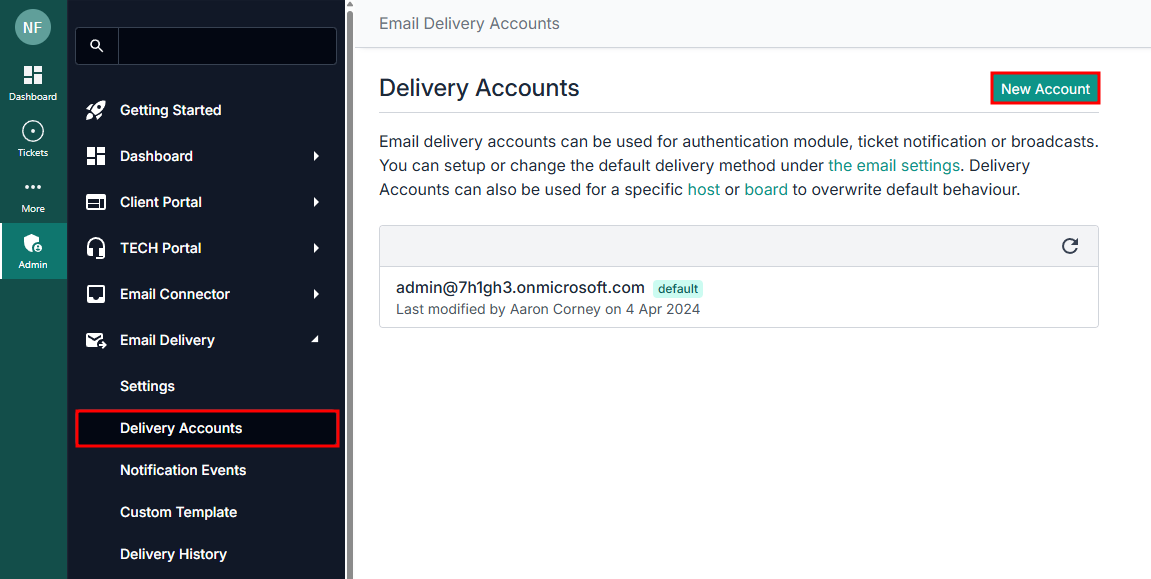
DeskDirector supports mail delivery via:
- SendGrid
- Office 365
- SMTP Server
SendGrid Mail Delivery
SendGrid email delivery can be easily created via the Admin portal under Email > Delivery Accounts > New Account:
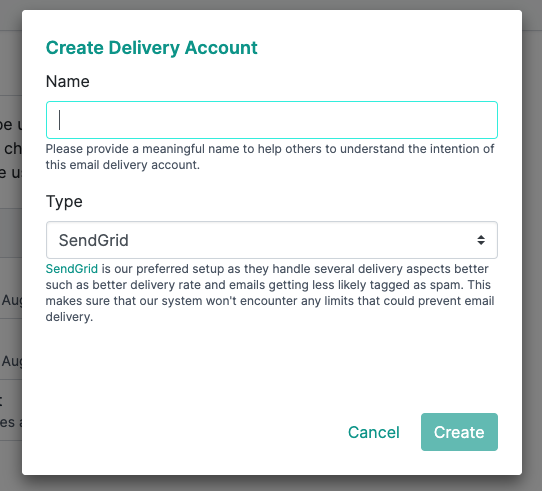
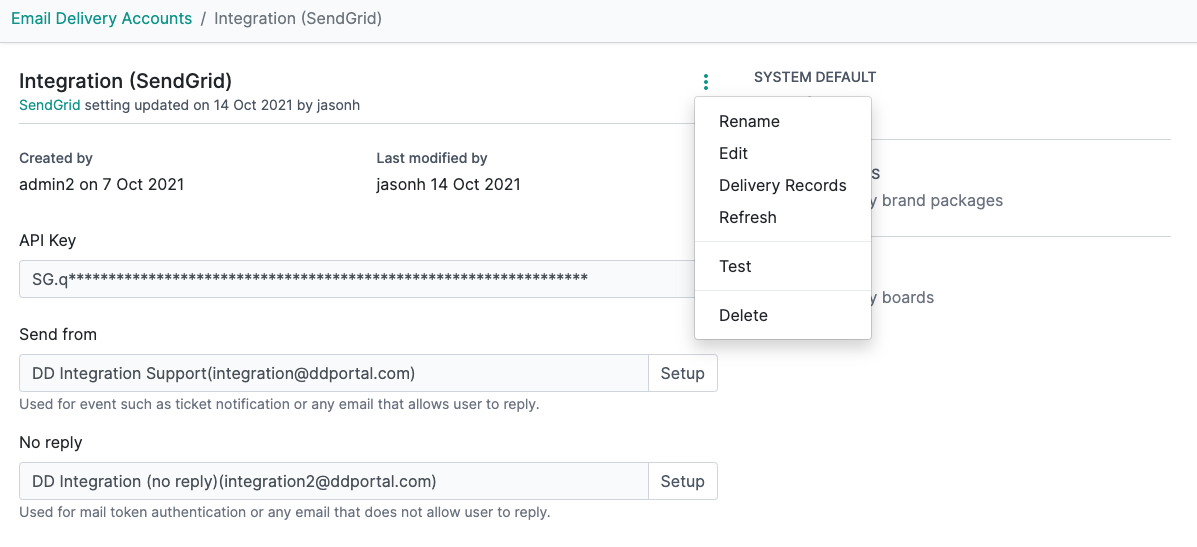
You will need your SendGrid API Key for the integration to work. Once configured, specify the Send From and No reply email address. Finally, test the account to confirm if it works.
Office365 Mail Delivery
- An account with an Office 365 license that grants access to Exchange
- A primary mailbox
- Optionally, a shared mailbox
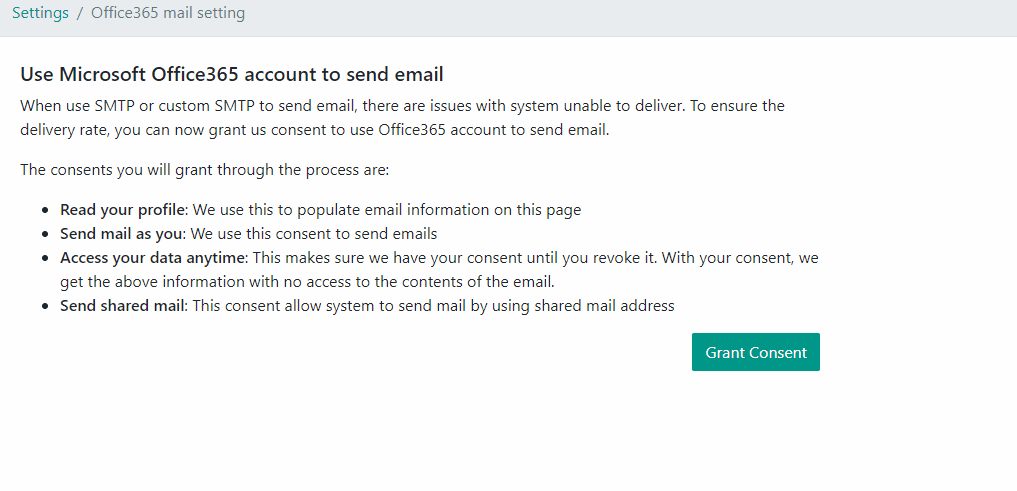
Office365 mail delivery can be configured under the Admin portal by heading to Email > Settings > Office 365 Mail Delivery.
- On the Office 365 Mail Delivery page, click Setup Office 365 Consent
- Enter your primary Office365 email address and click the Grant Consent button again
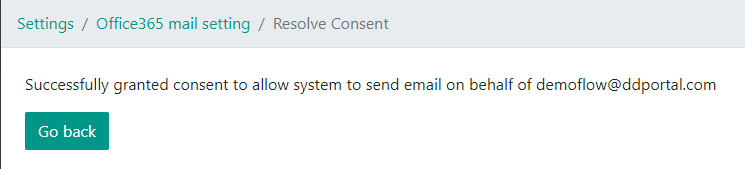
- You will be directed to a Microsoft 365 authentication page. Sign in with the credentials for your mail delivery account
- Review the required permissions and click accept
- Once you accept the permission requested, your browser will be redirected back to the DeskDirector Admin Portal. You should see a success message like this:
- From there, you can verify the email address that was set up to send emails from.
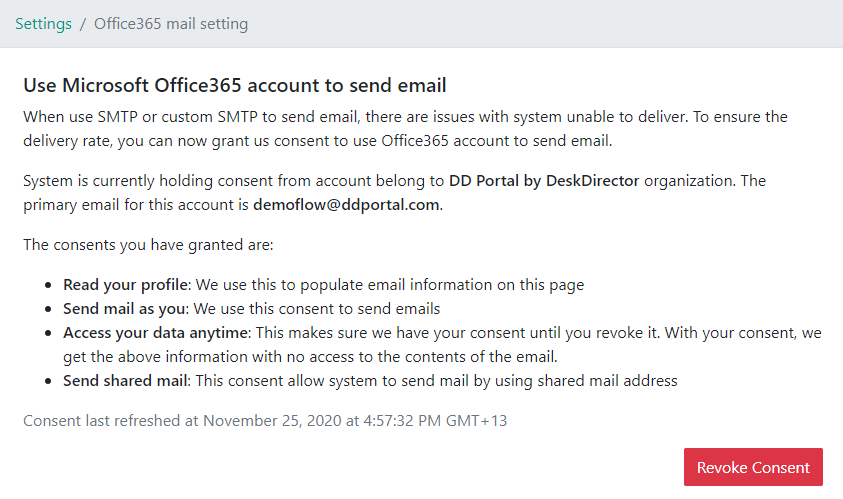
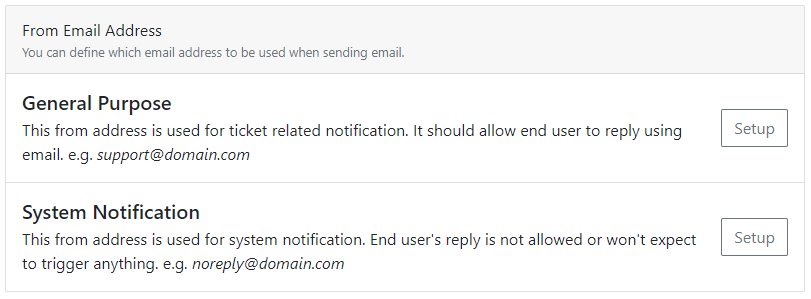
Once consent has been granted, you have the option to set up/modify the sender email address and display for General Purpose and System Notification emails sent by your DeskDirector instance.
How to create shared mail
As a general best practice, a shared mailbox is needed, as this will be used for system notification emails like password resets and login token requests, etc. You can follow Microsoft's guide to set up the shared mailbox.
Once the shared mailbox is created, add your account as a primary member on the account and double-check that they have the correct permissions set under Manage mailbox permissions. The Primary mailbox user will need read, manage, and send permissions.
SMTP Mail Delivery
To get started, log in to your DeskDirector Admin Portal and head to Email > Settings > SMTP Server Mail Delivery and click Setup SMTP.
You will need four things:
- SMTP Host
- SMTP Port
- Email User
- Email Password
You can easily secure these credentials from your email provider.
Here's an example of the SMTP fields filled:
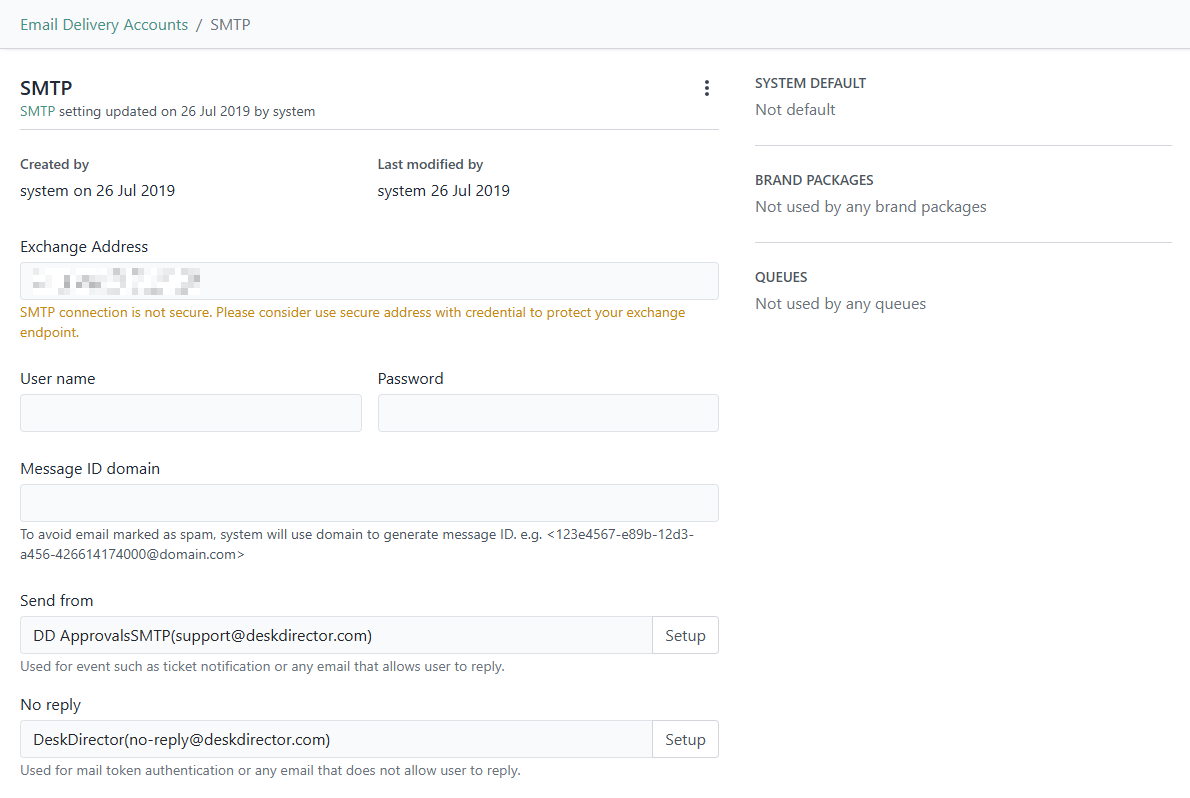
You will also have the option to set up or modify the sender email address and display name for General Purpose and System Notification emails sent by your DeskDirector instance (Send from and No reply, respectively).
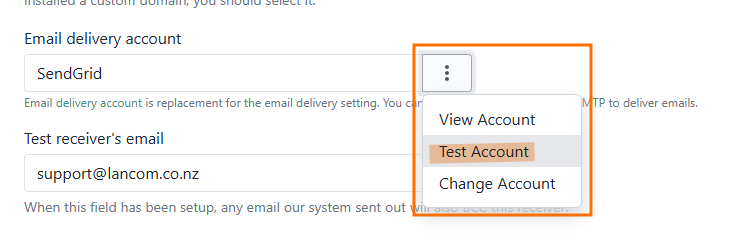
Once you have configured the SMTP settings, you can test the configuration easily from Email Delivery > Settings > Email Delivery. Just click on the hamburger menu by your Email delivery account, then select Test Account:
SPF Records
These records are used to indicate to mail exchanges which hosts are authorised to send mail for a domain. To get the SMTP mail setup working properly, you will need to configure the SPF record of your domain to include the following: include:spf.deskdirector.com
include:spf.deskdirector.com to the SPF record of deskdirector-demo.com.MX Toolbox is an online tool you can use to verify if your domain's SPF record is configured correctly.
Frequently Asked Questions
"Why is the custom email template I created not appearing on the template list on the Notification Event?"
Each email template you create is specific for the event where you created it. For example, an email template you created under "Mail Auth Token" can not be used as an email template for "Approval Required".